Disable ESXi CVE-2018-3646 warning

WARNNING: This host is potentially vulnerable to issues described in CVE-2018-3646, please refer to https://kb.vmware.com/s/article/55636 for details and VMware recommendations.


Disable ESXi CVE-2018-3646 warning For LAB

When testing things in the homelab, I frequently work with older hardware.

This means that when you use ESXi, you might get the following warning:

This host is potentially vulnerable to issues described in CVE-2018-3646, please refer to https://kb.vmware.com/s/articles/55636 for details and VMware recommendations.

I typically chose to ignore the warning, as this is a lab anyway. And this is fine on a stand alone host, but it is pretty annoying when using vCenter.

So if you are in the same situation, here is how to disable the warning:
Open your host configuration, go to System, Advanced System Settings, click “Edit…”
The key you are looking for is:

UserVars.SuppressHyperthreadWarning

Set this to a value of 1, press “OK” and refresh the host. The warning should now disappear.

Please do keep in mind that the vulnerability is still present, you did not eliminate the risk, you only disabled the warning.


Đọc thêm..

Manager NFS volumes on Esxi

I. Method 1:

- Run this command to list the mounted datastores:

esxcli storage filesystem list 

 - Run this command to unmount the NFS datastore:

Unmount the datastore by running this command:

esxcli storage filesystem unmount [-u UUID | -l label | -p path ]

For example, use one of these commands to unmount the LUN01 datastore:

esxcli storage filesystem unmount -l LUN01
esxcli storage filesystem unmount -u 4e414917-a8d75514-6bae-0019b9f1ecf4
esxcli storage filesystem unmount -p /vmfs/volumes/4e414917-a8d75514-6bae-0019b9f1ecf4

II. Method 2:

- Run this command to list the mounted datastores:

esxcli storage nfs list  

- Run this command to unmount the NFS datastore:

esxcli storage nfs remove -v NFS1

exam: NFS1 is datastore

After running the esxcli storage nfs remove -v NFS1 command and it fails with this error similar to:

Unable to complete Sysinfo operation. Please see the VMkernel log file for more details.: Sysinfo error: BusySee VMkernel log for details.

- To resolve this issue: 

Isolate the UUID of the NFS mount by running this command:

vmkfstools -Ph -v10 /vmfs/volumes/NFS1

Example: 

vmkfstools -Ph -v10 /vmfs/volumes/NFS1/ 


NFS-1.00 (Raw Major Version: 0) file system spanning 1 partitions.
File system label (if any): NFS1
Mode: public
Capacity 86.5 GB, 86.5 GB available, file block size 4 KB, max supported file size 16777216 TB
Disk Block Size: 512/512/0
UUID: 003e96eb-9f51034a-0000-000000000000
Logical device: 192.168.10.120 /mnt/Prod/NFS1
Partitions spanned (on "notDCS"):
        nfs:003e96eb-9f51034a -----> UUID 
NAS VAAI Supported: NO
Is Native Snapshot Capable: NO
OBJLIB-LIB: ObjLib cleanup done.
WORKER: asyncOps=0 maxActiveOps=0 maxPending=0 maxCompleted=0

  1. List out the open files under this UUID by running this command:

    lsof | grep 003e96eb-9f51034a

    Example:

    lsof | grep 003e96eb-9f51034a
    2101956     sh                    cwd                        -1   

     
  2. Stop the process by running this command:

    kill -9 PID

    Example:

    kill -9 2101956
     
  3. You should now be able to remove the NFS mount successfully.

Mount NFS from CMD:
esxcli storage nfs add -H 10.29.4.60 -s /volume2/Backup-VM -v NAS


-v : name NFS on esxi
-s : share folder
-H: NFS server


Đọc thêm..

Create VM to host rule Vmware

DRS VM to host rules are used in DRS clusters to specify whether VMs can or can’t be run on a host. These rules are used in conjunction with DRS groups for ease of administration. A DRS group can either consist of one or more VMs or one or more ESXi hosts.
You can create DRS groups using vSphere Web Client:
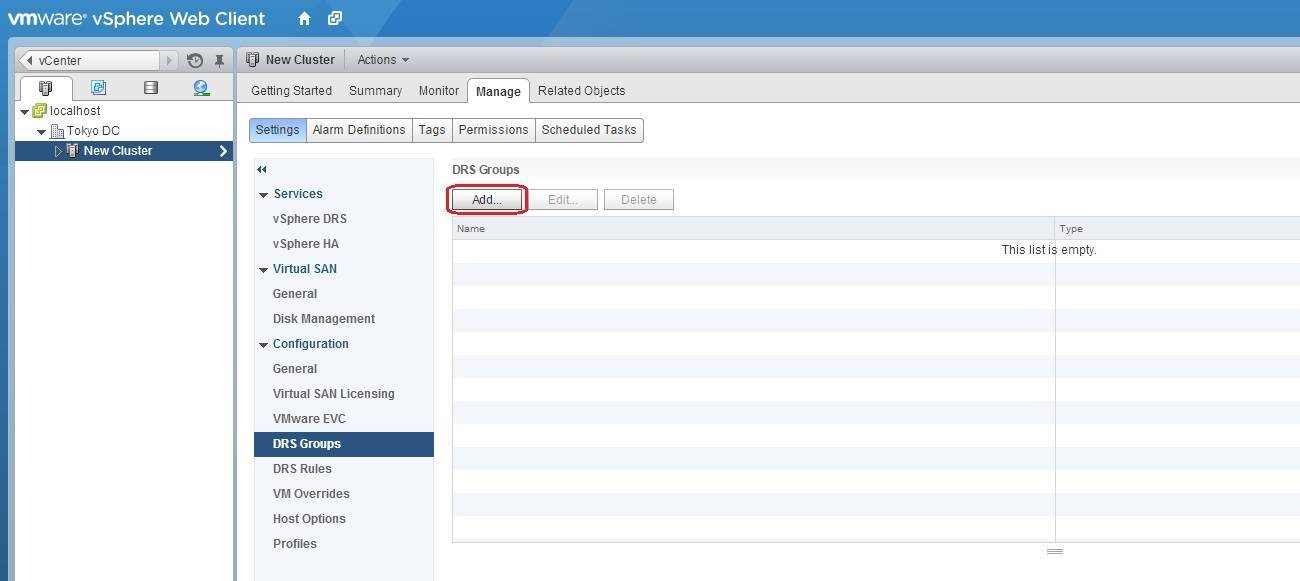
1. Select the DRS cluster in the inventory, go to Manage > Settings > DRS Groups, and click the Add button:
add drs group
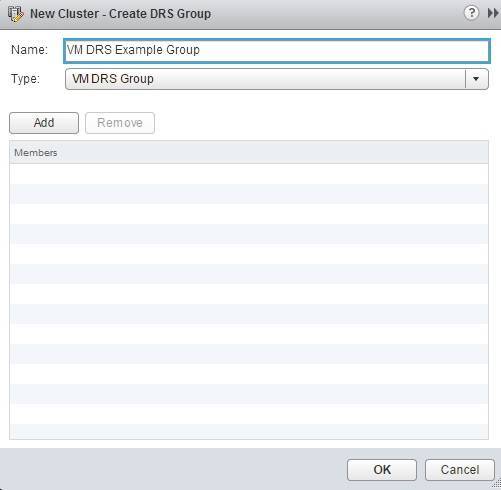
2. The Create DRS Group window opens. First we will create a VM DRS group. Enter the name for the group, select VM DRS Group as the group type, and click the Add button:
vm drs group
3. Select one or more VMs and click OK:
add vm drs group
4. Click OK to create the group.
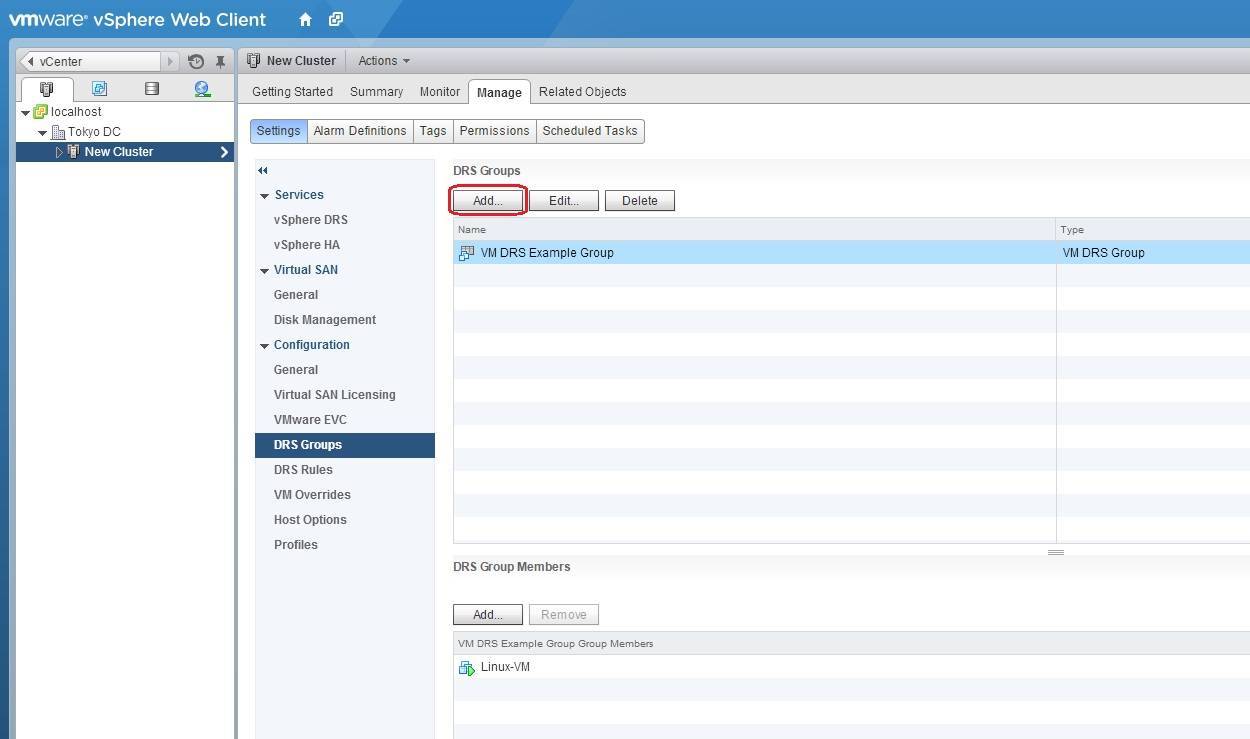
5. Next, we need to create a Host DRS group. In the DRS Groups panel, click Add:
drs add another group
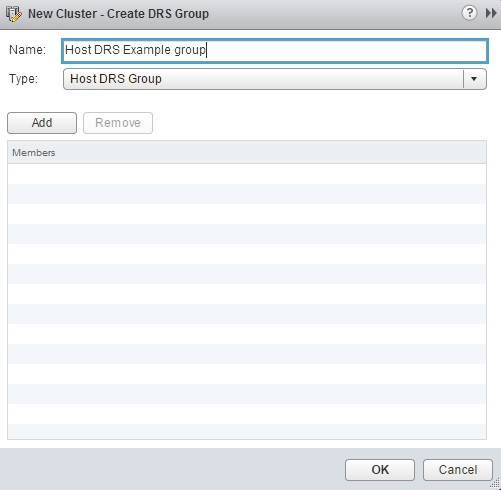
6. Type the name for the group, select Host DRS Group as the group type, and click the Add button:
host drs group
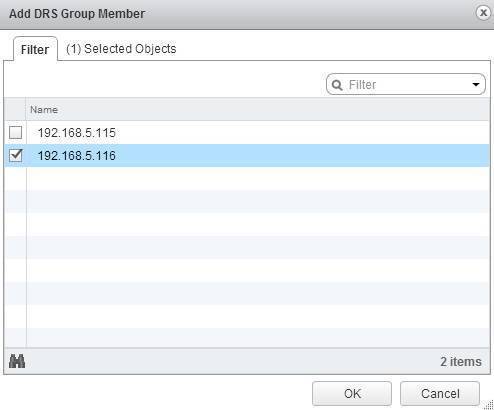
7. Select one or more ESXi hosts and click OK:
host drs group hosts
8. Click OK to create the group.
After you’ve created DRS groups, you can create a VM to host rule using vSphere Web Client:
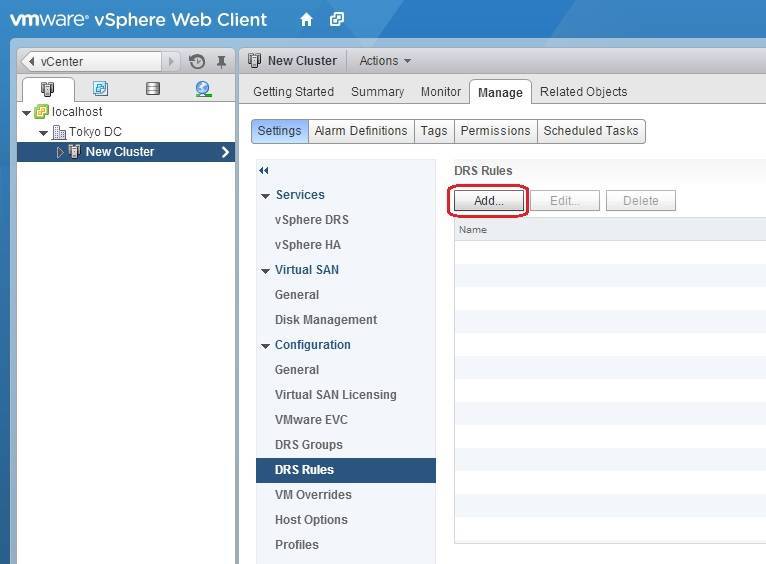
1. Select your cluster from the inventory, go to Manage > Settings > DRS Rules, and click the Add button:
add drs rules
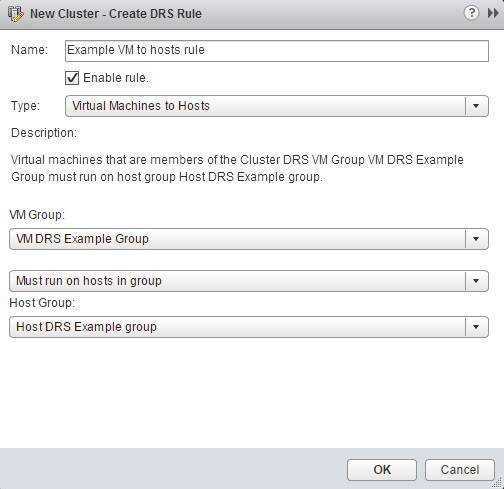
2. The Create DRS Rule window opens. Type the name for the rule and choose the rule type. In this example, we will create a rule that will keep a VM on a specific host, so select the Virtual Machines to Hosts type. We will also select the DRS VM Group and the DRS Host Group we’ve created in the previous step and select the Must run on hosts in group option:
create VM to host rule
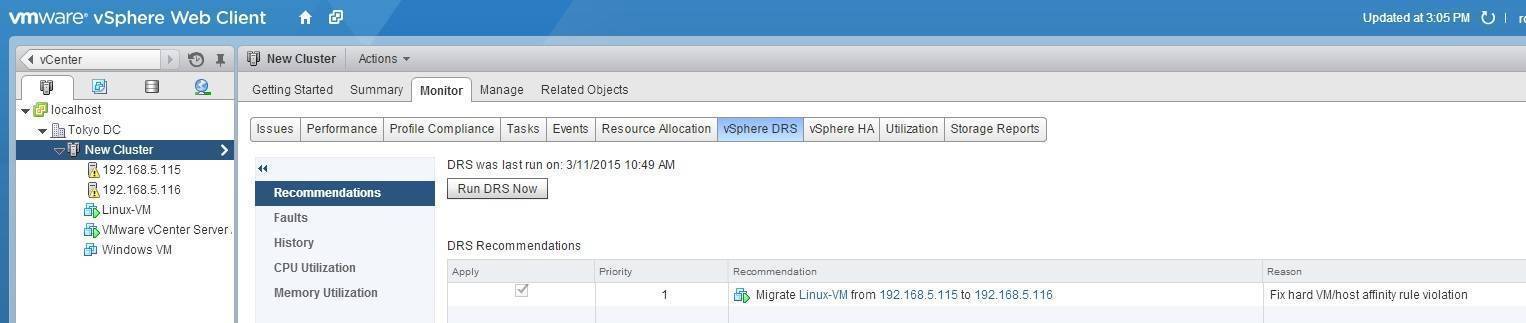
The rule we’ve created will force the VM from the group VM DRS Example Group (Linux-VM) to run on the host from the Host DRS Example Group (192.168.5.116). We can test this by selecting our cluster and going to Monitor > vSphere DRS. Because our VM is currently running on a different host, DRS will recommend to migrate Linux-VM to 192.168.5.116:


 https://geek-university.com/vmware-esxi/create-vm-to-host-rule/


Đọc thêm..

Determining how much RAM is installed in each slot on an ESX/ESXi host

To determine how much RAM is installed in each slot on an ESX/ESXi host:
  1. Login to the host using an SSH client.
  2. Run one of these commands as user root:
    • dmidecode|less

      Note: dmidecode|less is not available in 5.x versions.
    • smbiosDump
  3. In the output, locate the blocks of text beginning with Memory Device. Size or Max. Size indicates the amount of memory installed.
    The output for slots that have memory modules installed appears similar to:
    Memory Device
    Array Handle: 0x1000
    Error Information Handle: Not Provided
    Total Width: 72 bits
    Data Width: 64 bits
    Size: 4096 MB
    Form Factor: DIMM
    Set: 1
    Locator: DIMM_A1
    Bank Locator: Not Specified
    Type: <OUT OF SPEC>
    Type Detail: Synchronous
    Speed: 1333 MHz (0.8 ns)
    Manufacturer: 80AD009780AD
    Serial Number: 1680125F
    Asset Tag: 0109241D
    Part Number: HMT151R7AFP4C-H9
    The output for slots that are empty appears similar to:
    Memory Device
    Array Handle: 0x1000
    Error Information Handle: Not Provided
    Total Width: 72 bits
    Data Width: 64 bits
    Size: No Module Installed
    Form Factor: DIMM
    Set: 2
    Locator: DIMM_A4
    Bank Locator: Not Specified
    Type: <OUT OF SPEC>
    Type Detail: Synchronous
    Speed: Unknown
    Manufacturer:
    Serial Number:
    Asset Tag:
    Part Number:
Đọc thêm..

Resizing the disk space on Ubuntu Server VMs running on VMware ESXi 5

Resizing the disk space on Ubuntu Server VMs running on VMware ESXi 5 

- fdisk /dev/sda
- p
Device     Boot   Start      End  Sectors  Size Id Type
/dev/sda1  *       2048   999423   997376  487M 83 Linux
/dev/sda2       1001470 33552383 32550914 15.5G  5 Extended
/dev/sda5       1001472 33552383 32550912 15.5G 8e Linux LVM
- d

- 2
- n 
- e
- enter
- n 
- enter
- t 8e
 
I ran this command to resize the physical volume.
ubuntu@brick:~$ sudo pvresize /dev/sda5
Physical volume "/dev/sda5" changed
1 physical volume(s) resized / 0 physical volume(s) not resized

Then I ran this command to resize the logical root volume
ubuntu@brick:~$ sudo lvresize -l +100%FREE /dev/mapper/brick-root
Extending logical volume root to 118.76 GiB
Logical volume root successfully resized

Then I ran this command to resize the file system on the root partition. This took about 6 seconds.
ubuntu@brick:~$ sudo resize2fs /dev/mapper/brick-root
resize2fs 1.42.5 (29-Jul-2012)
Filesystem at /dev/mapper/brick-root is mounted on /; on-line resizing required
old_desc_blocks = 5, new_desc_blocks = 8
The filesystem on /dev/mapper/brick-root is now 31132672 blocks long.
Đọc thêm..

GhettoVCB Backup/Restore Vsphere VM

- Backup VMs stored in a list:

[root@databom ~]# ./ghettoVCB.sh -f vms_to_backup
File vms_to_backup:

Vm1
VM2
...

- Backup All VMs residing on specific ESX(i) host

[root@databom ~]# ./ghettoVCB.sh -a

- Backup All VMs residing on specific ESX(i) host and exclude the VMs in the exclusion list:

[root@databom ~]# ./ghettoVCB.sh -a -e vm_exclusion_list

- Restore VM stored in a list:

[root@himalaya ~]# ./ghettoVCB-restore.sh -c vms_to_restore -d 2
File: vms_to_restore
[root@himalaya ~]# cat vms_to_restore
#"<DIRECTORY or .TGZ>;<DATASTORE_TO_RESTORE_TO>;<DISK_FORMAT_TO_RESTORE>;<OPTIONAL_RESTORED_VM_DISPLAY_NAME>"
# DISK_FORMATS
# 1 = zeroedthick
# 2 = 2gbsparse
# 3 = thin
# 4 = eagerzeroedthick
# e.g.
# "/vmfs/volumes/dlgCore-NFS-bigboi.VM-Backups/WILLIAM_BACKUPS/VCAP/VCAP-2009-08-18--1;/vmfs/volumes/himalaya-local-SATA.RE4-GP:Storage;1""/vmfs/volumes/mini-local-datastore-2/backups/VCSA-5.1/VCSA-5.1-2012-12-25_01-30-36;/vmfs/volumes/mini-local-datastore-1;3"
"/vmfs/volumes/mini-local-datastore-2/backups/VCSA-5.1/VCSA-5.1-2012-12-25_01-30-36;/vmfs/volumes/mini-local-datastore-1;1;VCSA-RESTORE" 
VM to restoreDatastore to restore toVMDK formatRestore VM Name
/vmfs/volumes/mini-local-datastore-2/backups/VCSA-5.1/VCSA-5.1-2012-12-25_01-30-36/vmfs/volumes/mini-local-datastore-1thinVCSA-5.1
/vmfs/volumes/mini-local-datastore-2/backups/VCSA-5.1/VCSA-5.1-2012-12-25_01-30-36/vmfs/volumes/mini-local-datastore-zeroedthickVCSA-RESTORE


Đọc thêm..

GhettoVCB Cronjob

GhettoVCB Cronjob  

Basic:


e.g.
0 0 * * 1-5 /vmfs/volumes/dlgCore-NFS-bigboi.VM-Backups/ghettoVCB.sh -f /vmfs/volumes/dlgCore-NFS-bigboi.VM-Backups/backuplist > /dev/null
or
0 0 * * 1-5 /vmfs/volumes/dlgCore-NFS-bigboi.VM-Backups/ghettoVCB.sh -f /vmfs/volumes/dlgCore-NFS-bigboi.VM-Backups/backuplist > /tmp/ghettoVCB.log


Configure on ESXi:

1. Setup the cronjob by appending the following line to /var/spool/cron/crontabs/root:

0 0 * * 1-5 /vmfs/volumes/simplejack-local-storage/ghettoVCB.sh -f /vmfs/volumes/simplejack-local-storage/backuplist > /vmfs/volumes/simplejack-local-storage/ghettoVCB-backup-$(date +\%s).log

If you are unable to edit/modify /var/spool/cron/crontabs/root, please make a copy and then edit the copy with the changes
cp /var/spool/cron/crontabs/root /var/spool/cron/crontabs/root.backup
Once your changes have been made, then "mv" the backup to the original file. This may occur on ESXi 4.x or 5.x hosts
mv /var/spool/cron/crontabs/root.backup /var/spool/cron/crontabs/root
You can now verify the crontab entry has been updated by using "cat" utility.

2. Kill the current crond (cron daemon) and then restart the crond for the changes to take affect:

On ESXi < 3.5u3
kill $(ps | grep crond | cut -f 1 -d ' ')


On ESXi 3.5u3+
~ # kill $(pidof crond)
~ # crond


On ESXi 4.x/5.0
~ # kill $(cat /var/run/crond.pid)
~ # busybox crond

On ESXi 5.1
~ # kill $(cat /var/run/crond.pid)
~ # crond


3. Now that the cronjob is ready to go, you need to ensure that this  cronjob will persist through a reboot. You'll need to add the following two lines to /etc/rc.local (ensure that the cron entry matches what was defined above). In ESXi 5.1, you will need to edit /etc/rc.local.d/local.sh instead of /etc/rc.local as that is no longer valid.

On ESXi 3.5
/bin/kill $(pidof crond)
/bin/echo "0 0 * * 1-5 /vmfs/volumes/simplejack-local-storage/ghettoVCB.sh -f /vmfs/volumes/simplejack-local-storage/backuplist > /vmfs/volumes/simplejack-local-storage/ghettoVCB-backup-\$(date +\\%s).log" >> /var/spool/cron/crontabs/root
crond


On ESXi 4.x/5.0
/bin/kill $(cat /var/run/crond.pid)
/bin/echo "0 0 * * 1-5 /vmfs/volumes/simplejack-local-storage/ghettoVCB.sh -f /vmfs/volumes/simplejack-local-storage/backuplist > /vmfs/volumes/simplejack-local-storage/ghettoVCB-backup-\$(date +\\%s).log" >> /var/spool/cron/crontabs/root
/bin/busybox crond

On ESXi 5.1
/bin/kill $(cat /var/run/crond.pid)
/bin/echo "0 0 * * 1-5 /vmfs/volumes/simplejack-local-storage/ghettoVCB.sh -f /vmfs/volumes/simplejack-local-storage/backuplist > /vmfs/volumes/simplejack-local-storage/ghettoVCB-backup-\$(date +\\%s).log" >> /var/spool/cron/crontabs/root
crond


Afterwards the file should look like the following:

~ # cat /etc/rc.local
#! /bin/ash
export PATH=/sbin:/bin

log() {
   echo "$1"
   logger init "$1"
}

#execute all service retgistered in /etc/rc.local.d
if [http:// -d /etc/rc.local.d |http:// -d /etc/rc.local.d ]; then
   for filename in `find /etc/rc.local.d/ | sort`
      do
         if [ -f $filename ] && [ -x $filename ]; then
            log "running $filename"
            $filename
         fi
      done
fi

/bin/kill $(cat /var/run/crond.pid)
/bin/echo "0 0 * * 1-5 /vmfs/volumes/simplejack-local-storage/ghettoVCB.sh -f /vmfs/volumes/simplejack-local-storage/backuplist > /vmfs/volumes/simplejack-local-storage/ghettoVCB-backup-\$(date +\\%s).log" >> /var/spool/cron/crontabs/root
/bin/busybox crond


This will ensure that the cronjob is re-created upon a reboot of the system through a startup script
Đọc thêm..

vSphere 5.5 – Enable SNMP

I am going through setting up Solarwinds Virtual Manager and needed to enable SNMP on my vSphere 5.5 hosts. So the service set to automatically start but it will not start without generating an error when attempting to start the service as seen below.
14-28-44
So in case you run into the same thing it is as simple as running the following commands on your individual hosts from a console session. Replace YOUR_STRING with the community string that you would like to use. The last command sets the firewall to allow all to poll SNMP.
esxcli system snmp set --communities YOUR_STRING
esxcli system snmp set --enable true
esxcli network firewall ruleset set --ruleset-id snmp --allowed-all true
esxcli network firewall ruleset set --ruleset-id snmp --enabled true
/etc/init.d/snmpd restart
You can change the firewall rule to only allow a specific subnet or host if you would like to.
esxcli network firewall ruleset set --ruleset-id snmp --allowed-all false
esxcli network firewall ruleset allowedip add --ruleset-id snmp --ip-address 10.0.101.0/24
esxcli network firewall ruleset set --ruleset-id snmp --enabled true
/etc/init.d/snmpd restart
So you are thinking well that is great but I have more than just a few hosts and would like to run this using PowerCLI. So here you go, a bit of PowerCLI to set your SNMP up on each of your hosts in vCenter.
# PowerCLI Script for adding syslogserver to hosts
# @mrlesmithjr
# EverythingShouldBeVirtual.com
# Change the following to match your environment
# vi_server is your vCenter
$vi_server = “vcenterservername”
$vcuser = "vcenterserverusername"
$vcpass = "vcenterserverpassword"
$communities = "public"
$syslocation = "Atlanta"

Connect-VIServer -Server $vi_server -User $vcuser -Password $vcpass

# Setup variable to use in script for all hosts in vCenter
$vmhosts = @(Get-VMHost)

# Configure syslog on each host in vCenter
foreach ($vmhost in $vmhosts) {
Write-Host ‘$vmhost = ‘ $vmhost
$esxcli = Get-EsxCli -VMHost $vmhost
$esxcli.system.snmp.set($null,$communities,"true",$null,$null,$null,$null,$null,$null,$null,$null,$null,$syslocation)
$esxcli.system.snmp.get()
}

Disconnect-VIServer * -Confirm:$false
So there you have it. You are good to go now. Have fun SNMP’ing away!
Enjoy!
Đọc thêm..

Start/Stop VM on Esxi by commands


Start/Stop command:
  • List all VMs registered to this host (This reveals the Vmid needed for other commands)
    vim-cmd /vmsvc/getallvms
  • Unregister a VM
    vim-cmd /vmsvc/unregister <Vmid>
  • Register a VM
    vim-cmd /solo/register /path/to/file.vmx
  • Get power state of a VM
    vim-cmd /vmsvc/power.getstate <Vimid>
  • Power off a VM
    vim-cmd /vmsvc/power.off <Vmid>
  • Power on a VM
    vim-cmd /vmsvc/power.on <Vmid>
Or Stop VM:

  1. Open a console session where the esxcli tool is available, either in the ESXi Shell, the vSphere Management Assistant (vMA), or the location where the vSphere Command-Line Interface (vCLI) is installed.
  2. Get a list of running virtual machines, identified by World ID, UUID, Display Name and path to the .vmx configuration file, using this command:

    esxcli vm process list
  3. Power off one of the virtual machines from the list using this command:

    esxcli vm process kill --type=[soft,hard,force] --world-id=WorldNumber

    Note: Three power-off methods are available. Soft is the most graceful, hard performs an immediate shutdown, and force should be used as a last resort.
Đọc thêm..

Add cron Job to VMware ESX/ESXi

This explains how to add a cron job to VMware in such a way that it will still be there after reboots.

Having
enabled ssh access to your ESX/ESXi server, ssh in as root.

Firstly, add the cron job to the root crontab:

  1. Edit /var/spool/cron/crontabs/root
  2. Add the line (all on one line)
    5 0 * * * /full/path/to/script arguments/with/full/path > /full/path/to/logfile 2>&1
  3. Run the command "cat /var/run/crond.pid"
    That will print the process number of the running crond, such as 12345
  4. Run the command "kill 12345"
    where "12345" should be replaced with the number output by the previous command

For details of the meaning of "5 0 * * *" (5 minutes past midnight every day) read the man page for crontab(5) on any Unix/Linux server, or else
on the web.

Now, add a command to
/etc/rc.local to re-generate the cron job when ESX/ESXi reboots
  1. Edit /etc/rc.local, using a command such as "vi /etc/rc.local".
  2. At the end of the file, add 3 lines (using "G" then "O" in vi). The first kills crond, the second adds the new cron job to the root crontab file, ad the third restarts crond:
    /bin/kill $(cat /var/run/crond.pid)
    /bin/echo '5 0 * * * /full/path/to/script arguments/with/full/path > /full/path/to/logfile 2>&1' >> /var/spool/cron/crontabs/root
    /bin/busybox crond
  3. Save and exit the editor (Press the "Esc" key then ":wq" then press "Return" in vi)
  4. Run the command "auto-backup.sh" so that the change to /etc/rc.local survives a reboot.

Every time you change the cron job, remember to update
/etc/rc.local as well and run the "auto-backup.sh" command to backup the new /etc/rc.local file.
Đọc thêm..

ESXi enabling SNMP

Last night I wrote an article about how to monitor the health of an ESXi server (link here) and I wanted to explain a bit more about my findings with SNMP on an ESXi host.
My goal with the monitoring was to use the check_dell and check_hp commands I have found for Nagios/Opsview to monitor the hardware that ESX is running on. The ESXi installs I am working with are using the Dell and HP management agents installed so I thought that everything would work out of the box and enabling SNMP would let me query the different aspects of the hardware.
The official line from VMWare was that SNMP is not enabled on ESXi and with no console cant be enabled. I knew however, having read a recent post on theTechHead blog (link here) that you could see the snmp.xml file and this shows that it is not enabled which made me think it must be possible to enable it. I was right.
A quick google came up with this article and I had a look and this was a fairly simple process to run:
First you need to enter the “unsupported” console on your ESXi server. To do this press Ctrl+Alt+F1 at your ESX console, now type the wordunsupported (N.B. you will not see the text on your screen) and press Enter. If all goes well you should see a password prompt, enter your root password here and you should get a warning you are entering a mode that should only be enabled with VMWare support and be presented with a console.
type the following command to enter the VI text editor and start to modify the snmp.xml file:
vi /etc/vmware/snmp.xml
You should see a single line of text at the top of the screen which is the contents of the xml file. Press i to enter Insert mode and change
<enabled>false</enabled>
to
<enabled>true</enabled>
Then scroll across and add the community name you want the SNMP agent to respond on and place this between the following tags
<communities></communities>
so it should look like
<communities>public</communities>
I wasnt interested in setting up SNMP traps so left this blank and quit the VI editor by press Esc to exit insert mode and then :wq to write the file and quit the editor.
Finally we need to restart the services on the esx host which can be done with the following command
/sbin/services.sh restart
Great, SNMP is now enabled so I should be able to get the information from the HP/Dell management agents that I want. Wrong. My snmpwalk of the host provided little to no useful information about what I was trying to unlock.
Đọc thêm..

Adding a static route to an ESX host for an extra Service Console interface


Symptoms

accessing-network  connection-fails-network  connect-network  esx-networking  no-network  separate-network  network-connection

Purpose

This article provides steps to add a static route for an extra Service Console network interface on an ESX host.

Resolution

Additional static routes can be added to route the traffic destined for a particular network segment via an alternate upstream router or gateway. This is useful when configuring multiple Service Console network interfaces, to statically assign different gateway addresses for different network segments.

To apply a static route automatically when the ESX host starts:
  1. Open a console to the ESX host. For more information, see Unable to connect to an ESX host using Secure Shell (SSH) (1003807).
  2. Open the /etc/sysconfig/static-routes file using a text editor. For more information, see Editing configuration files in VMware ESX (1017022).
  3. Add a line for each desired static route using the syntax:any net <TargetNetwork> netmask <NetmaskAddress> gw <GatewayAddress>
    For example, to route network traffic destined for 142.121.56.0/23 through the gateway at 244.58.175.1, add the line:
    any net 142.121.56.0 netmask 255.255.254.0 gw 244.58.175.1
  4. Run this command to apply the network configuration change:service network restart
  5. Run this command to verify that the route was added successfully:route
To manually add a static route on a running host:
  1. Open a console to the ESX host. For more information, see Unable to connect to an ESX host using Secure Shell (SSH) (1003807).
  2. Add a static route using the command:route add -net <TargetNetwork> netmask <NetmaskAddress> gw <GatewayAddress>
    For example, to route network traffic destined for 142.121.56.0/23 through the gateway at 244.58.175.1, run the command:
    route add -net 142.121.56.0 netmask 255.255.254.0 gw 244.58.175.1
  3. Run this command to verify that the route was added successfully:route
The configuration change takes effect immediately, but does not persist across a reboot
(from www.vmware.com)
Đọc thêm..