Manager NFS volumes on Esxi

I. Method 1:

- Run this command to list the mounted datastores:

esxcli storage filesystem list 

 - Run this command to unmount the NFS datastore:

Unmount the datastore by running this command:

esxcli storage filesystem unmount [-u UUID | -l label | -p path ]

For example, use one of these commands to unmount the LUN01 datastore:

esxcli storage filesystem unmount -l LUN01
esxcli storage filesystem unmount -u 4e414917-a8d75514-6bae-0019b9f1ecf4
esxcli storage filesystem unmount -p /vmfs/volumes/4e414917-a8d75514-6bae-0019b9f1ecf4

II. Method 2:

- Run this command to list the mounted datastores:

esxcli storage nfs list  

- Run this command to unmount the NFS datastore:

esxcli storage nfs remove -v NFS1

exam: NFS1 is datastore

After running the esxcli storage nfs remove -v NFS1 command and it fails with this error similar to:

Unable to complete Sysinfo operation. Please see the VMkernel log file for more details.: Sysinfo error: BusySee VMkernel log for details.

- To resolve this issue: 

Isolate the UUID of the NFS mount by running this command:

vmkfstools -Ph -v10 /vmfs/volumes/NFS1

Example: 

vmkfstools -Ph -v10 /vmfs/volumes/NFS1/ 


NFS-1.00 (Raw Major Version: 0) file system spanning 1 partitions.
File system label (if any): NFS1
Mode: public
Capacity 86.5 GB, 86.5 GB available, file block size 4 KB, max supported file size 16777216 TB
Disk Block Size: 512/512/0
UUID: 003e96eb-9f51034a-0000-000000000000
Logical device: 192.168.10.120 /mnt/Prod/NFS1
Partitions spanned (on "notDCS"):
        nfs:003e96eb-9f51034a -----> UUID 
NAS VAAI Supported: NO
Is Native Snapshot Capable: NO
OBJLIB-LIB: ObjLib cleanup done.
WORKER: asyncOps=0 maxActiveOps=0 maxPending=0 maxCompleted=0

  1. List out the open files under this UUID by running this command:

    lsof | grep 003e96eb-9f51034a

    Example:

    lsof | grep 003e96eb-9f51034a
    2101956     sh                    cwd                        -1   

     
  2. Stop the process by running this command:

    kill -9 PID

    Example:

    kill -9 2101956
     
  3. You should now be able to remove the NFS mount successfully.

Mount NFS from CMD:
esxcli storage nfs add -H 10.29.4.60 -s /volume2/Backup-VM -v NAS


-v : name NFS on esxi
-s : share folder
-H: NFS server


Đọc thêm..

VMware vCenter SNMP Configuration


Commands

Here are the commands I have used for the vCenter SNMP configuration. Note: make sure you have access to the root account to perform the login.

# Step 1: Start an SSH connection with the vCenter Server (use Putty or something equivalent).

# Step 2: Login as the root user

# Step 3: After a successful login you should be in the appliance Shell.

# Step 4: View the current configuration for SNMP
snmp.get

# Step 5: Configure the SNMP Community (in this example I use MySnmpCommunity)
snmp.set --communities MySnmpCommunity

# Step 6: Allow a device to access the SNMP agent (192.168.10.10 = monitoring server)
snmp.set --targets 192.168.10.10@161/MySnmpCommunity,172.0.0.1@161/MySnmpCommunity,localhost@161/MySnmpCommunity

# Step 7: Enable the SNMP Agent
snmp.enable

# Step 7: Verify the SNMP Settings configured
snmp.get

# Step 8: Test the working (in my case it never works... not sure why? Has something to do with my access restrictions?)
snmp.test

# Step 9: Perform a test from the monitoring server (in my case a Linux machine with snmpwalk)
snmpwalk -v2c -c MySnmpCommunity %hostname-vcenter%
Đọc thêm..

How to enable SNMP on a VMware ESXi hypervisor

For Auvik to properly monitor your VMware ESXi hypervisor, you must either manually classify the ESXi host as a hypervisor in Auvik or enable SNMP for Auvik to automatically classify it.
To manually reclassify the hypervisor, see How do I edit device details? and select Hypervisor as the device type. Once you correctly classify the hypervisor, add your VMware credentials into Auvik.
To enable SNMP on your ESXi hypervisor, follow the steps below.

How to enable SNMP on an ESXi hypervisor

SNMP can be fully configured on an ESXi hypervisor through the ESX CLI. The commands vary between different versions of ESXi.
To gather more valuable and accurate data from your virtual environment, we highly recommended you have VMware Tools installed on each virtual machine.

How to enable SNMP on ESXi 5.0

  1. You’ll need access to the vSphere CLI. If you don't have the vSphere CLI installed, download it from the VMware support website.
  2. Execute the following commands. Replace YOUR_STRING with your desired community string. your_username and your_password correspond to your vSphere username and password, respectively.
  3. vicfg-snmp.pl --server hostname --username your_username --password your_password -c YOUR_STRING
    vicfg-snmp.pl --server hostname --username your_username --password your_password -p 161
    vicfg-snmp.pl --server hostname --username your_username --password your_password --enable
  4. If you selected a community string other than public or private, enter that string into Auvik by following these steps.
  5. If in Step 2 you chose to “Apply these credentials to all devices we discover that meet the criteria below” ensure that:
    1. Device Type = All Device Types
    2. Vendor = All Vendors
You’re all done! Your VMware hypervisors will now be discovered by Auvik. If you haven’t already done so, you should now add your VMware credentials for your VMware hypervisors and hosts.

How to enable SNMP on ESXi 5.5

  1. SSH or Telnet to your ESXi node using root-level credentials.
  2. Execute the following commands. Replace YOUR_STRING with your desired community string.
    esxcli system snmp set --communities YOUR_STRING
    esxcli system snmp set --enable true
    esxcli network firewall ruleset set --ruleset-id snmp --allowed-all true
    esxcli network firewall ruleset set --ruleset-id snmp --enabled true
    /etc/init.d/snmpd restart
  3. If you selected a community string other than public or private, enter that string into Auvik by following these steps.
  4. If in Step 2 you chose to “Apply these credentials to all devices we discover that meet the criteria below” ensure that:
    1. Device Type = All Device Types
    2. Vendor = All Vendors
You’re all done! Your VMware hypervisors will now be discovered by Auvik. If you haven’t already done so, you should now add your VMware credentials for your VMware hypervisors and hosts.

How to enable SNMP on ESXi 6.x

  1. SSH or Telnet to your ESXi node using root-level credentials.
  2. Execute the following commands. Replace YOUR_STRING with your desired community string.
    esxcli system snmp set -r
    esxcli system snmp set -c YOUR_STRING
    esxcli system snmp set -p 161
    esxcli system snmp set -L "City, State, Country"
    esxcli system snmp set -C noc@example.com
    esxcli system snmp set -e yes
  3. If you selected a community string other than public or private, enter that string into Auvik by following these steps.
  4. If in Step 2 you chose to “Apply these credentials to all devices we discover that meet the criteria below” ensure that:
    1. Device Type = All Device Types
    2. Vendor = All Vendors
You’re all done! Your VMware hypervisors will now be discovered by Auvik. If you haven’t already done so, you should now add your VMware credentials for your VMware hypervisors and hosts.
 
Note:
  1. Remove the snmptraps ramdisk and the mount point
$ localcli system visorfs ramdisk remove -t /var/spool/snmp
$ rm -r /var/spool/snmp
  1. Start the snmpd service:
$ /etc/init.d/snmpd start

 
(https://support.auvik.com/hc/en-us/articles/206311526-How-to-enable-SNMP-on-a-VMware-ESXi-hypervisor) 
(https://knowledge.broadcom.com/external/article?legacyId=59806)
Đọc thêm..

Create VM to host rule Vmware

DRS VM to host rules are used in DRS clusters to specify whether VMs can or can’t be run on a host. These rules are used in conjunction with DRS groups for ease of administration. A DRS group can either consist of one or more VMs or one or more ESXi hosts.
You can create DRS groups using vSphere Web Client:
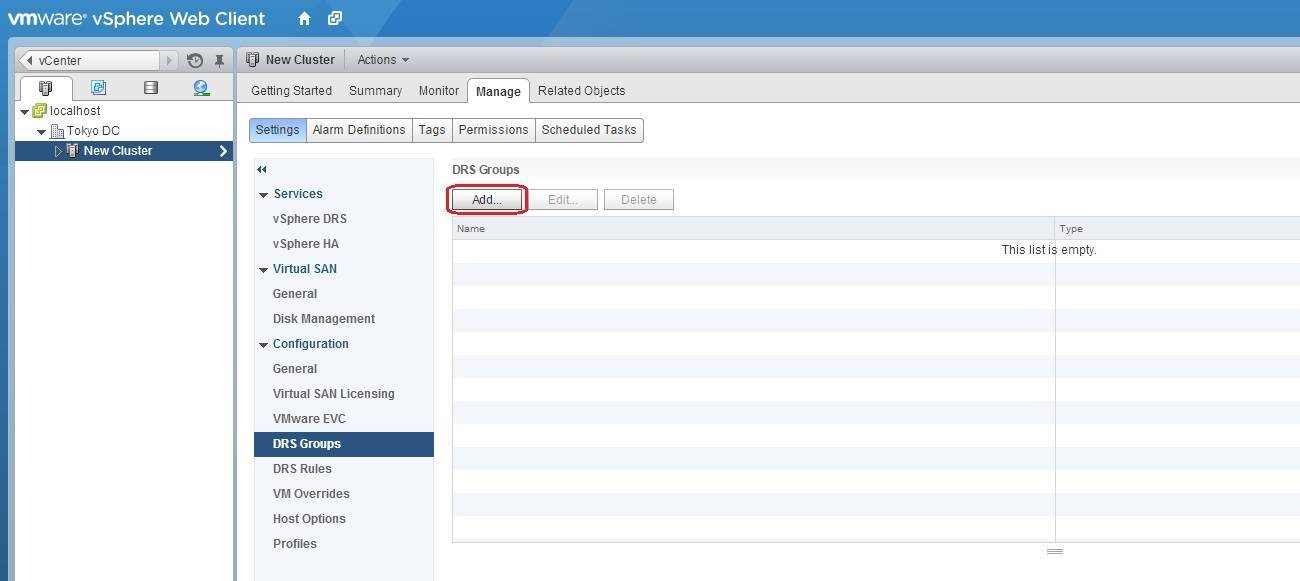
1. Select the DRS cluster in the inventory, go to Manage > Settings > DRS Groups, and click the Add button:
add drs group
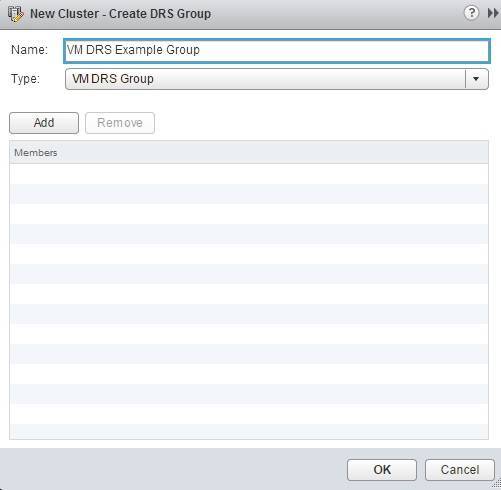
2. The Create DRS Group window opens. First we will create a VM DRS group. Enter the name for the group, select VM DRS Group as the group type, and click the Add button:
vm drs group
3. Select one or more VMs and click OK:
add vm drs group
4. Click OK to create the group.
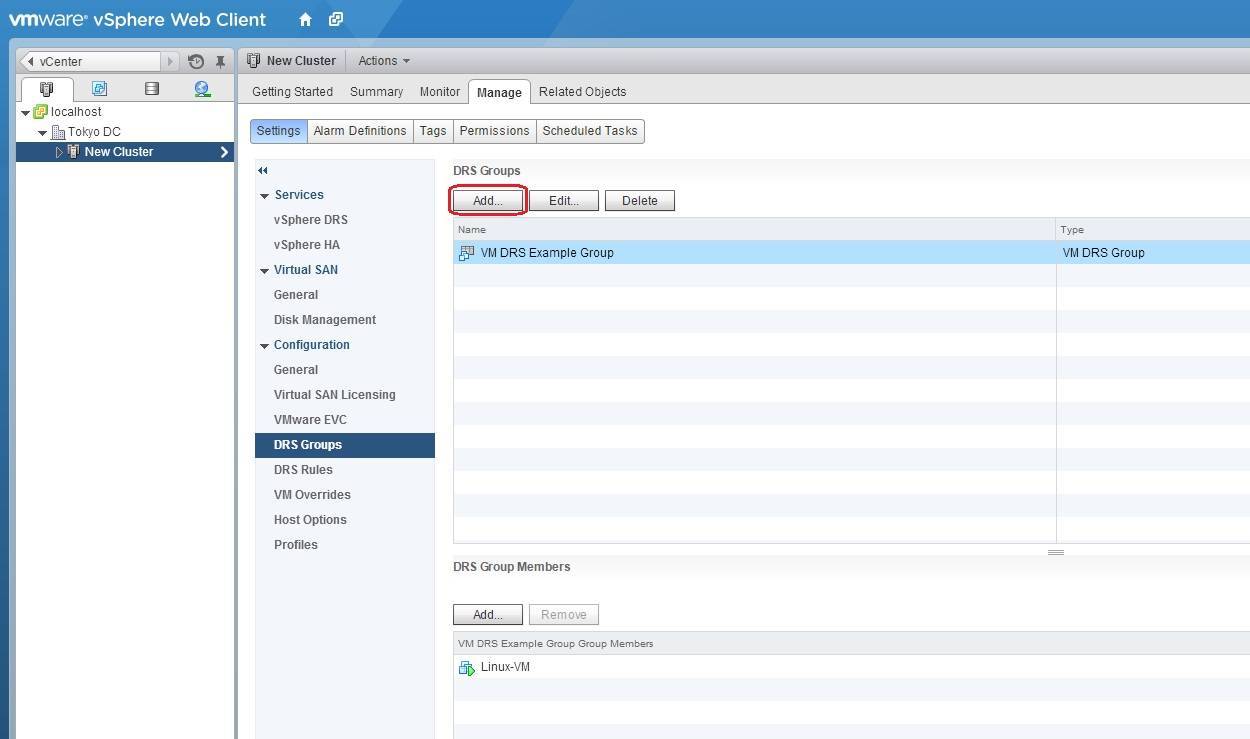
5. Next, we need to create a Host DRS group. In the DRS Groups panel, click Add:
drs add another group
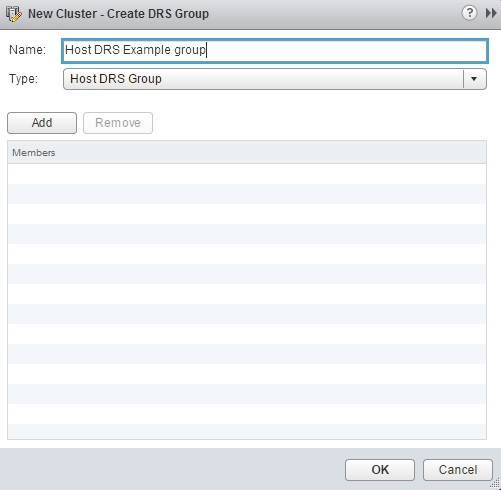
6. Type the name for the group, select Host DRS Group as the group type, and click the Add button:
host drs group
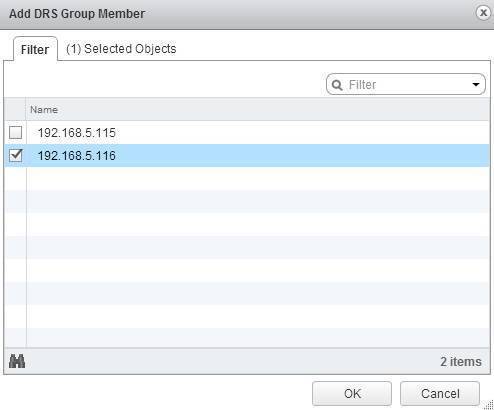
7. Select one or more ESXi hosts and click OK:
host drs group hosts
8. Click OK to create the group.
After you’ve created DRS groups, you can create a VM to host rule using vSphere Web Client:
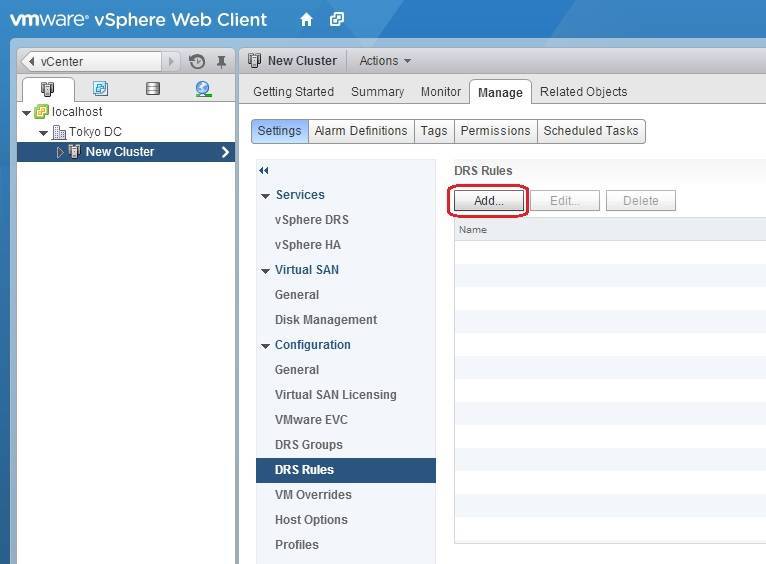
1. Select your cluster from the inventory, go to Manage > Settings > DRS Rules, and click the Add button:
add drs rules
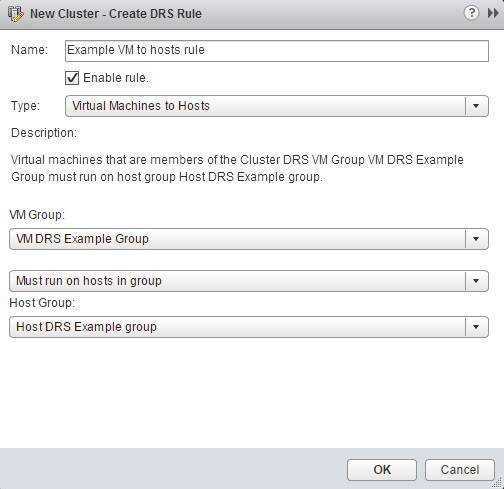
2. The Create DRS Rule window opens. Type the name for the rule and choose the rule type. In this example, we will create a rule that will keep a VM on a specific host, so select the Virtual Machines to Hosts type. We will also select the DRS VM Group and the DRS Host Group we’ve created in the previous step and select the Must run on hosts in group option:
create VM to host rule
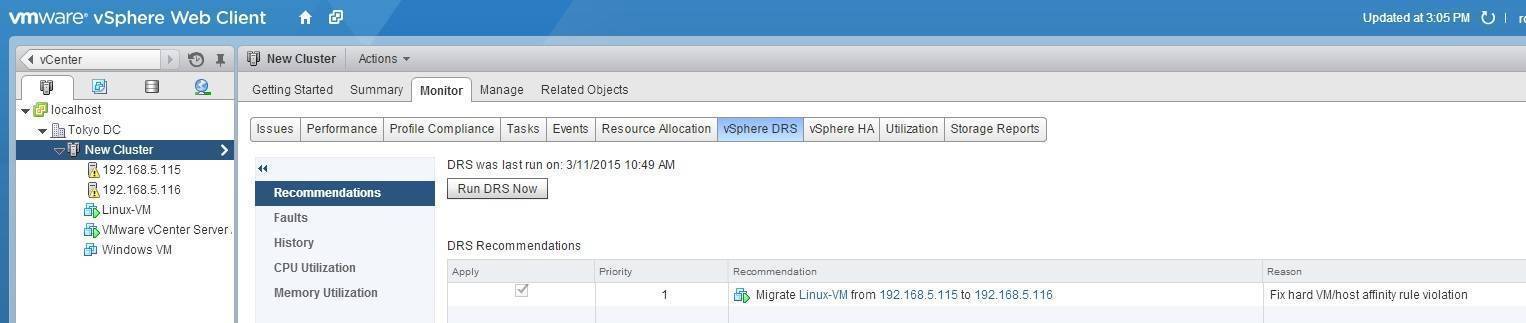
The rule we’ve created will force the VM from the group VM DRS Example Group (Linux-VM) to run on the host from the Host DRS Example Group (192.168.5.116). We can test this by selecting our cluster and going to Monitor > vSphere DRS. Because our VM is currently running on a different host, DRS will recommend to migrate Linux-VM to 192.168.5.116:


 https://geek-university.com/vmware-esxi/create-vm-to-host-rule/


Đọc thêm..

Vmware error: Cannot Start a VM - A general system error occurred: Connection refused

Vmware error: Cannot Start a VM - A general system error occurred: Connection refused

#####################
The error referenced in the title was one I ran into today while trying to start some VMs.  I finally found a KB somewhat related to this issue and the workaround did the trick for me.

Basically, the vCenter Workflow Manager service had stopped on my vCenter server.  In my case, I'm running the 6.0.0 vApp so I had to open an SSH session and enter the following:

shell.set --enabled true
shell
service-control --status vmware-vpx-workflow
   (this command confirmed the service was stopped)
service-control --start vmware-vpx-workflow

Once running, I was able to start VMs again from vCenter.
#####################
To resolve this issue, start the VMware vCenter workflow manager service.

Windows vCenter Server

  1. On the server that runs vCenter Server, open Start > Run, type services.msc and press Enter.
  2. Right-click VMware vCenter workflow manager service and click start.
  3. Attempt to power on the virtual machine again.

vCenter Server Appliance (VCSA)

  1. Connect to the VCSA shell as root. For more information, see:

  2. Run this command to restart the VMware vCenter workflow service (vmware-vpx-workflow):

    # service vmware-vpx-workflow restart
  3. Attempt to power on the virtual machine again.


Đọc thêm..

Determining how much RAM is installed in each slot on an ESX/ESXi host

To determine how much RAM is installed in each slot on an ESX/ESXi host:
  1. Login to the host using an SSH client.
  2. Run one of these commands as user root:
    • dmidecode|less

      Note: dmidecode|less is not available in 5.x versions.
    • smbiosDump
  3. In the output, locate the blocks of text beginning with Memory Device. Size or Max. Size indicates the amount of memory installed.
    The output for slots that have memory modules installed appears similar to:
    Memory Device
    Array Handle: 0x1000
    Error Information Handle: Not Provided
    Total Width: 72 bits
    Data Width: 64 bits
    Size: 4096 MB
    Form Factor: DIMM
    Set: 1
    Locator: DIMM_A1
    Bank Locator: Not Specified
    Type: <OUT OF SPEC>
    Type Detail: Synchronous
    Speed: 1333 MHz (0.8 ns)
    Manufacturer: 80AD009780AD
    Serial Number: 1680125F
    Asset Tag: 0109241D
    Part Number: HMT151R7AFP4C-H9
    The output for slots that are empty appears similar to:
    Memory Device
    Array Handle: 0x1000
    Error Information Handle: Not Provided
    Total Width: 72 bits
    Data Width: 64 bits
    Size: No Module Installed
    Form Factor: DIMM
    Set: 2
    Locator: DIMM_A4
    Bank Locator: Not Specified
    Type: <OUT OF SPEC>
    Type Detail: Synchronous
    Speed: Unknown
    Manufacturer:
    Serial Number:
    Asset Tag:
    Part Number:
Đọc thêm..

Free tools for VMware ESXi

There are a couple of tools I use with my test ESXi hosts, which are running with free licence and are not managed by vCenter.
    1.WebUI
This nice package comes from VMware labs and allows you to acces some features of the host from web interface, which is great as there is no desktop vsphere client for Linux.
The package can be downloaded from here. The installation is pretty straightforward. After the installation you can access this UI from https://<esxhost>/ui/. Nice thing – it’s a little big faster the vsphere Web client and doesn’t use plugins.
    2.ghettoVCB
I use this tool(github) to create occasional backups and move VMs from one host to another, which is much faster than using secure copy as it uses vStorage API (VCB). All you need is to:
  • put it on your ESXi host with scp
  • unzip it (unzip tool is preinstalled on the host) to a datastore (if you unzip it to / it will be erased after reboot).
unzip ghettoVCB-master.zip -d /vmfs/volumes/datastore1
  • edit/vmfs/volumes/datastore1/ghettoVCB-master/ghettoVCB.conf
VM_BACKUP_VOLUME- the place the to put backups, usually it’s a folder on a remote datastore, mounted to the host
DISK_BACKUP_FORMAT – disk format, during the backup disk format can be changed from thin to thick and from eager zeroed to lazy zeroed.
VM_BACKUP_ROTATION_COUNT – number of backups
POWER_VM_DOWN_BEFORE_BACKUP- combined with vmware tools on a guest systems this option allows graceful shutdowm of a VM.
ENABLE_HARD_POWER_OFF – forces shutdown.
  • create vms_to_backup file and list names of necessary VMs, each on a separate line
  • run backup with
# ./ghettoVCB.sh -f ./vms_to_backup  -g ./ghettoVCB.conf
Restoration is also very simple
  • create a file vms_to_restore like this:
"/vmfs/volumes/remote_datastore/backups/folder_with_VM1/;/vmfs/volumes/datastore1;4;VM1-test"
"/vmfs/volumes/remote_datastore/backups/folder_with_VM2/;/vmfs/volumes/datastore1;4;VM2-test"
where each line specifies path to backup (the folder with vmdk file), destination on a host where the machine would run, disk format type (4 for eagerzeroedthick) and a new name.
  • run restore scipt
# ./ghettoVCB-restore.sh -c vms_to_restore
The script will clone and register the VM on the destination host. You can power it up from the client later, and client will ask you whether you moved it (uuid and MAC will stay the same) or copied (uuids and MAC would be regenerated and ruin MAC-bonded licences on your VM).
Full documentation on ghettoVCB can be found here(backup) and here(restore).
Đọc thêm..

Creating a nested lab

Creating a nested lab

I was just building a nested lab to record some demo videos. I find myself googling for this every single time so I figured I would write about it so I can easily get it of my own website. Many have written about this before and all credits go to William Lam and Eric Gray, which are the two  main blogs I have used in the past to get this working.
After installing ESXi on my physical box I “ssh” in to it. In order to allow “nested ESXi” to boot a 64bit OS you will need to run the following:
echo 'vhv.allow = "TRUE"' >> /etc/vmware/config
After you have done that you will want to make sure you will get network connection. Go to your “VM Network” portgroup, or if you named it differently the portgroup that is used to connect the virtual ESXi hosts to. For each of the hosts do the following:
  1. Click on the host
  2. Go to “Configuration”
  3. Click on “Networking”
  4. Click “Properties” on the vSwitch
  5. Select the correct portgroup
  6. Click “Edit”
  7. Click “Security”
  8. Set “Promiscuous Mode” to “Accept”
  9. Click “Ok”
  10. Click “Close”
Now for each virtual ESXi host (note there is a “guest os” called ESXi 5 in there, use it!) that you have created do the following:
  1. Right click on the VM
  2. Click “Edit settings”
  3. Click the “Options” tab
  4. Click on “CPU/MMU virtualization”
  5. Select the 4th option “Use Intel VT-x / AMD-v…”
I am building this out to record a new of “DR of the Cloud”. In other words, 3 virtual clusters + vCloud Director + SRM + vSphere Replication + Virtual Storage Appliances… Cool stuff right.
Be Sociable, Share!
Đọc thêm..

Creating a Nested ESXi 5 Environment

Creating a Nested ESXi 5 Environment


**UPDATED for ESXi 5.1 HERE**

Since vSphere 5 was released earlier this year, it is now time to get ready to pass the VCP exam.  I am a VCP for both 3.5 and 4, and decided I would post some updates along the way as I study before taking the VCP 5 exam.
The first thing I did was create a lab environment. I currently use 2 whitebox ESXi 5 servers, attached to iSCSI storage.
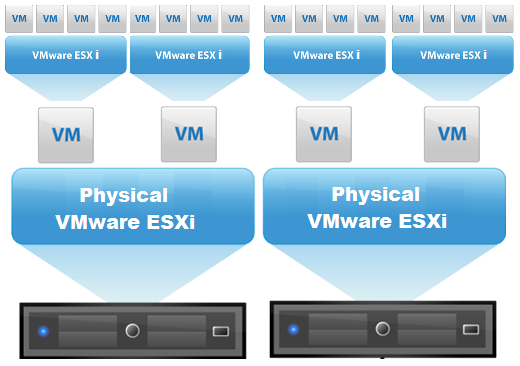
However, since I am studying VMware products, I don’t want to configure, and reconfigure these 2 ESXi servers constantly.  Thankfully, I can run Nested ESXi Servers – or, run ESXi 5 inside of ESXi 5.  I can even run 64bit guests inside of my virtualized ESXi servers!  See below:

Now, I can run more than 2 ESXi servers, and blow them away and recreate if needed. (yes, it will be slow).

In order to run ESXi 5 inside of ESXi 5, there are a couple of steps we need to do:
First, we will need to add a line to the etc/vmware/config file.  Using SSH to connect to your ESXi server, type the following:
echo ‘vhv.allow = “true” ‘ >> /etc/vmware/config
Second, we need to make sure the networking is setup properly.  On each host, for your VM Network, enable promiscuous mode for the port group.
  • click Configuration
  • click Networking
  • click Properties for your vSwitch with the VM Network (assuming your haven’t renamed”
  • Click “VM Network” and choose Edit.
  • Click Security
  • Check Promiscuous Mode and choose Enable.

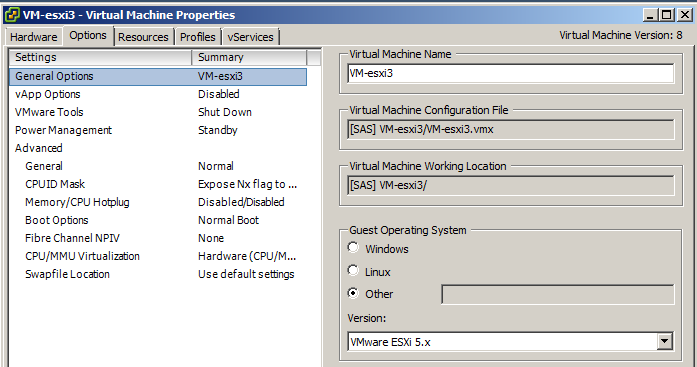
Next, create a VM for each ESXi host with 2CPUs, and at least 4GB of RAM. When creating the VM, make sure that it is version 8 HW, and that for the operating system you choose “other” and select “Other (64 bit)”.  Once the VM is created, we will choose to edit it’s settings.  In the Options tab, you can now change the OS to “VMware ESXi 5.x”

Last, we need to make sure that under “CPUID Mask” that we expose the NX/XD Flag to the guest if it is not already.
Now, you can power on the VM, and install ESXi 5 from an ISO image.
Once installed, you can then create 64bit guests inside of your virtual ESXi server.

 VMware Workstation 8
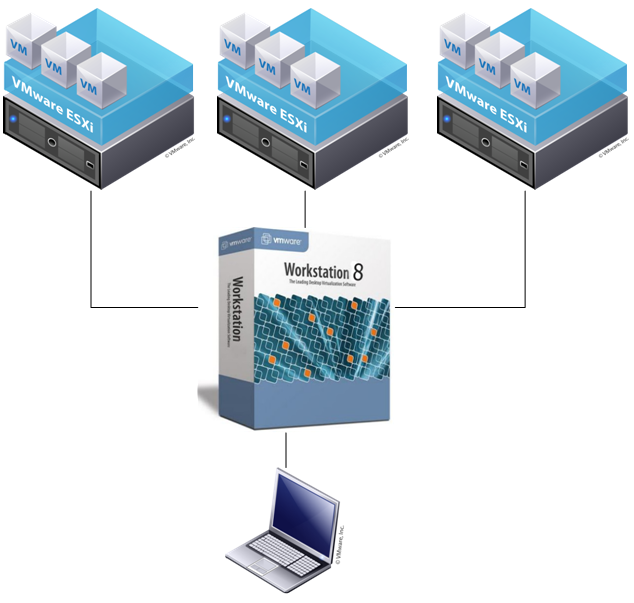
The best thing about VMware, is I can also virtualize ESXi inside VMware Workstation!  So on my laptop, in VMware Workstation, I can run multiple ESXi servers, that in turn have VMs inside them.  Even better is the fact that I can have 64bit guests inside my ESXi servers running inside VMware Workstation.  Sounds confusing as I type, so here’s a diagram:

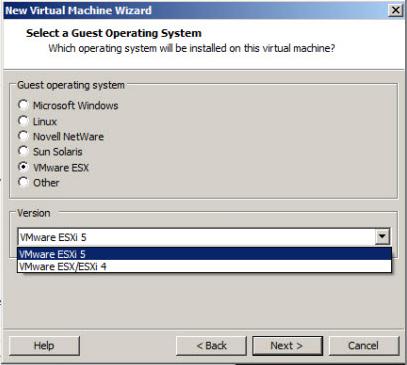
In order to run ESXi inside VMware workstation, we simply need to select “VMware ESXi 5” as the operation system of the guest VM we are creating.

Then, Edit the VM’s Settings, and under the Hardware tab, and processors, check the box to Virtualize Intel VT.

The option to run ESXi inside of VMware workstation is great, especially for when you don’t have a lot of physical hardware to test with.
Đọc thêm..

GhettoVCB Backup/Restore Vsphere VM

- Backup VMs stored in a list:

[root@databom ~]# ./ghettoVCB.sh -f vms_to_backup
File vms_to_backup:

Vm1
VM2
...

- Backup All VMs residing on specific ESX(i) host

[root@databom ~]# ./ghettoVCB.sh -a

- Backup All VMs residing on specific ESX(i) host and exclude the VMs in the exclusion list:

[root@databom ~]# ./ghettoVCB.sh -a -e vm_exclusion_list

- Restore VM stored in a list:

[root@himalaya ~]# ./ghettoVCB-restore.sh -c vms_to_restore -d 2
File: vms_to_restore
[root@himalaya ~]# cat vms_to_restore
#"<DIRECTORY or .TGZ>;<DATASTORE_TO_RESTORE_TO>;<DISK_FORMAT_TO_RESTORE>;<OPTIONAL_RESTORED_VM_DISPLAY_NAME>"
# DISK_FORMATS
# 1 = zeroedthick
# 2 = 2gbsparse
# 3 = thin
# 4 = eagerzeroedthick
# e.g.
# "/vmfs/volumes/dlgCore-NFS-bigboi.VM-Backups/WILLIAM_BACKUPS/VCAP/VCAP-2009-08-18--1;/vmfs/volumes/himalaya-local-SATA.RE4-GP:Storage;1""/vmfs/volumes/mini-local-datastore-2/backups/VCSA-5.1/VCSA-5.1-2012-12-25_01-30-36;/vmfs/volumes/mini-local-datastore-1;3"
"/vmfs/volumes/mini-local-datastore-2/backups/VCSA-5.1/VCSA-5.1-2012-12-25_01-30-36;/vmfs/volumes/mini-local-datastore-1;1;VCSA-RESTORE" 
VM to restoreDatastore to restore toVMDK formatRestore VM Name
/vmfs/volumes/mini-local-datastore-2/backups/VCSA-5.1/VCSA-5.1-2012-12-25_01-30-36/vmfs/volumes/mini-local-datastore-1thinVCSA-5.1
/vmfs/volumes/mini-local-datastore-2/backups/VCSA-5.1/VCSA-5.1-2012-12-25_01-30-36/vmfs/volumes/mini-local-datastore-zeroedthickVCSA-RESTORE


Đọc thêm..