Configure Dynu in PFSense

PFSense is an open source firewall/router computer software distribution based on FreeBSD. You may use Dynu dynamic DNS service with 'Custom' option.
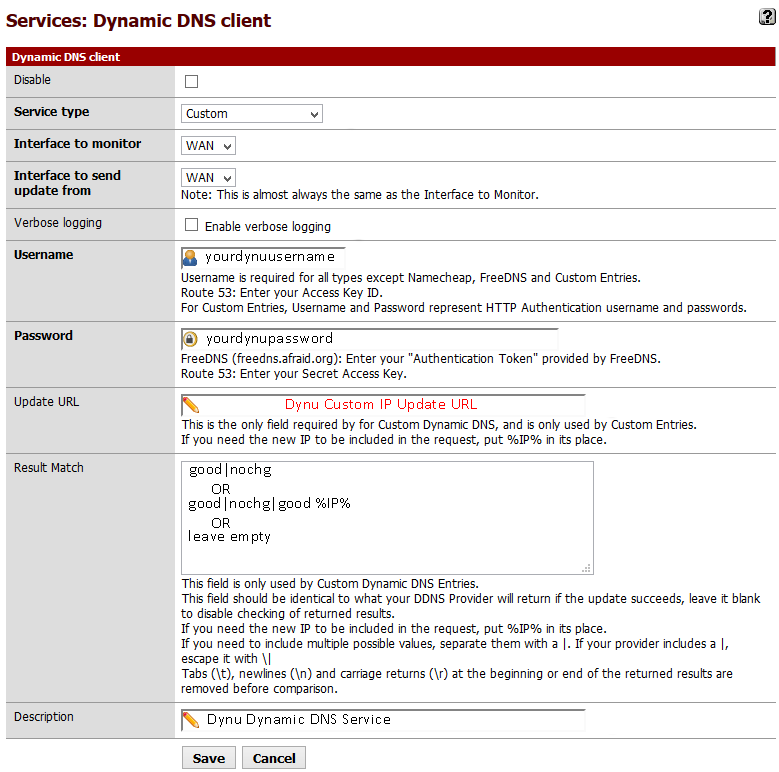

PFSense Dynu Dynamic DNS

From the main menu, select Services then Dynamic DNS . Use the following settings:

  • Service Type : Custom
  • Interface to monitor : WAN
  • Interface to send update from : WAN
  • Username : your Dynu username
  • Password : your Dynu password or MD5 encrypted password
  • Hostname : example.dynu.com or yourdomain.com
  • URL : Dynu Custom IP Update URL
  • Result Match : good|nochg


  • Listing Item   Dynu Custom IP Update URL

    Update one domain name

  • Non SSL: http://api.dynu.com/nic/update?hostname=example.dynu.com&password=PASSWORD
  • SSL Format: https://api.dynu.com/nic/update?hostname=example.dynu.com&password=PASSWORD

  • Update all domains in your account

  • Non SSL: http://api.dynu.com/nic/update?username=USERNAME&password=PASSWORD
  • SSL Format: https://api.dynu.com/nic/update?username=USERNAME&password=PASSWORD

  • Update an alias

  • Non SSL: http://api.dynu.com/nic/update?hostname=example.dynu.com&alias=Alias&password=PASSWORD
  • SSL Format: https://api.dynu.com/nic/update?hostname=example.dynu.com&alias=Alias&password=PASSWORD
  • Dynu
    Đọc thêm..

    PFSENSE CUSTOM DHCPD CONFIGURATION

    PFSENSE CUSTOM DHCPD CONFIGURATION

    pfSense is my prefered router/firewall distro. It’s rock solid and has tons of features.
    You can run pfSense on any PC, but if you want to keep the power and heat down to a minimum you can use an  Alix board (http://www.pcengines.ch/alix.htm) or similar.
    One of the few things you can’t do in pfSense is modify your dhcpd.conf file directly.
    For the vast majority of deployments, the built in control you have will be more than enough. It supports multiple vlans, and custom options. But…
    If you need something special, like running a DHCP Server for several IP subnets, then you need a different approach. Or maybe you just like to maintain a single file instead of using the GUI interface.
    This is not a common requirement for a network, but it does happen.
    I had a test-lab with a few Layer 3 switches and several subnets. I wanted to have an easy one-file configuration for the entire network using only the low-power pfSense router. So I had to figure out a way to do that.
    There is no dhcpd.conf file you can edit because it’s generated on each boot using the config.xml file (managed by all the settings in the GUI). Now the problem is that if you want any special settings in your dhcpd.conf file, it might not be supported by the config.xml markup and/or the GUI.
    DHCP daemon starts in a chrooted environment in /var/dhcpd, so all files are located with this folder as a parent.
    The solution is pretty simple. Just stop the DHCP daemon after boot, replace the dhcpd.conf file and restart the daemon.
    If you don’t have a monitor on your router, you can enable SSH or use a serial console cable.
    It’s also possible to do almost everything using the Diagnostics -> Edit File menu item in the GUI. To create a file, just enter the full path and click Save.
    ScreenClip
    This solution requires two files.
    1) 
    The first one is a script, like this:

    #/bin/bash
    killall -3 dhcpd
    cp /var/dhcpd/etc/dhcpd.override /var/dhcpd/etc/dhcpd.conf
    /usr/local/sbin/dhcpd -user dhcpd -group _dhcp -chroot /var/dhcpd -cf /etc/dhcpd.conf -pf /var/run/dhcpd.pid le1 le0
    Save it as: /usr/local/etc/rc.d/dhcpdoverride.sh
    pfSense will run any script in this folder (/urs/local/etc/rc.d/) after it has started. The only requirements is the execute flag and that the file ends with .sh
    So you’ll need to run this command as well:

    chmod +x /usr/local/etc/rc.d/dhcpdoverride.sh
    NOTE!
    The last command in this file may be different from system to system. Notice that one or more interfaces are being listed at the end. It’s easy to get the exact command of your system if you have done the initial configuration in GUI (included the interfaces you’ll be using).
    Just run this command:

    ps axww | grep dhcpd
    The output should look something like this:

    [2.1.3-RELEASE][root@pfSense.localdomain]/var(35): ps axww | grep dhcpd
    38392  ??  Ss     0:00.04 /usr/local/sbin/dhcpd -user dhcpd -group _dhcp -chroot /var/dhcpd -cf /etc/dhcpd.conf -pf /var/run/dhcpd.pid le1 le0
    I’m using two interfaces with DCHPD, so two interfaces are listed at the end.
    2)
    The second file is your own dhcpd.conf file.
    If you have a file already then just save it as:
    /var/dhcpd/etc/dhcpd.conf.override
    If you don’t have a file already made, you can do the initial configuration in the GUI and just copy the file that is created. Then you have a good starting point.
    After you have done your initial configuration in the GUI you can copy it like this:

    cp /var/dhcpd/etc/dhcpd.conf /var/dhcpd/etc/dhcpd.conf.override
    OR, using the GUI, like this
    Go to Using Diagnostics -> Edit file:
    open /var/dhcpd/etc/dhcpd.conf
    then edit the filepath to /var/dhcpd/etc/dhcpd.conf.override and click Save
    And that’s all!
    Now you can edit dhcpd.conf.override with IP subnets, or anything you like.
    An example of dhcpd.conf with multiple subnets:
    option domain-name "localdomain";
    default-lease-time 7200;
    max-lease-time 86400;
    log-facility local7;
    ddns-update-style none;
    authoritative;
    
    #Subnet Alpha
    subnet 10.50.150.0 netmask 255.255.255.0 {
      pool {
        range 10.50.150.100 10.50.150.200;
      }
      option routers 10.50.150.3;
      option domain-name-servers 10.50.150.3;
    }
    
    #Subnet Delta
    subnet 10.18.200.0 netmask 255.255.255.0 {
      pool {
        range 10.18.200.100 10.18.200.200;
      }
      option routers 10.18.200.2;
      option domain-name-servers 10.50.150.3;# ex. a static IP address for a printer
    
      host HPPrinter { # example of a static IP address for a device
        hardware ethernet xx:xx:xx:xx:xx:xx; # replace the MAC address
        fixed-address 10.18.200.10;
        option host-name "HPLaserJet";
      }
    }
    
    NOTE!
    You’ll need to replace the xx:xx:xx…  with the actual MAC address of your device.
    And also;
    If you are doing this to create subnets, you will also need to enable DHCP relay on your switch or routers between these subnets.


    https://happy-coder.com/2014/06/27/pfsense-custom-dhcpd-configuration/
    Đọc thêm..

    PFsense custom DHCPD configuration

    PFsense custom DHCPD configuration

    pfSense is my prefered router/firewall distro. It’s rock solid and has tons of features.
    You can run pfSense on any PC, but if you want to keep the power and heat down to a minimum you can use an  Alix board (http://www.pcengines.ch/alix.htm) or similar.
    One of the few things you can’t do in pfSense is modify your dhcpd.conf file directly.
    For the vast majority of deployments, the built in control you have will be more than enough. It supports multiple vlans, and custom options. But…
    If you need something special, like running a DHCP Server for several IP subnets, then you need a different approach. Or maybe you just like to maintain a single file instead of using the GUI interface.
    This is not a common requirement for a network, but it does happen.
    I had a test-lab with a few Layer 3 switches and several subnets. I wanted to have an easy one-file configuration for the entire network using only the low-power pfSense router. So I had to figure out a way to do that.
    There is no dhcpd.conf file you can edit because it’s generated on each boot using the config.xml file (managed by all the settings in the GUI). Now the problem is that if you want any special settings in your dhcpd.conf file, it might not be supported by the config.xml markup and/or the GUI.
    DHCP daemon starts in a chrooted environment in /var/dhcpd, so all files are located with this folder as a parent.
    The solution is pretty simple. Just stop the DHCP daemon after boot, replace the dhcpd.conf file and restart the daemon.
    If you don’t have a monitor on your router, you can enable SSH or use a serial console cable.
    It’s also possible to do almost everything using the Diagnostics -> Edit File menu item in the GUI. To create a file, just enter the full path and click Save.
    ScreenClip
    This solution requires two files.
    1) 
    The first one is a script, like this:

    #/bin/bash
    killall -3 dhcpd
    cp /var/dhcpd/etc/dhcpd.override /var/dhcpd/etc/dhcpd.conf
    /usr/local/sbin/dhcpd -user dhcpd -group _dhcp -chroot /var/dhcpd -cf /etc/dhcpd.conf -pf /var/run/dhcpd.pid le1 le0

    Save it as: /usr/local/etc/rc.d/dhcpdoverride.sh
    pfSense will run any script in this folder (/urs/local/etc/rc.d/) after it has started. The only requirements is the execute flag and that the file ends with .sh
    So you’ll need to run this command as well:

    chmod +x /usr/local/etc/rc.d/dhcpdoverride.sh

    NOTE!
    The last command in this file may be different from system to system. Notice that one or more interfaces are being listed at the end. It’s easy to get the exact command of your system if you have done the initial configuration in GUI (included the interfaces you’ll be using).
    Just run this command:

    ps axww | grep dhcpd

    The output should look something like this:

    [2.1.3-RELEASE][root@pfSense.localdomain]/var(35): ps axww | grep dhcpd
    38392  ??  Ss     0:00.04 /usr/local/sbin/dhcpd -user dhcpd -group _dhcp -chroot /var/dhcpd -cf /etc/dhcpd.conf -pf /var/run/dhcpd.pid le1 le0

    I’m using two interfaces with DCHPD, so two interfaces are listed at the end.
    2)
    The second file is your own dhcpd.conf file.
    If you have a file already then just save it as:
    /var/dhcpd/etc/dhcpd.conf.override
    If you don’t have a file already made, you can do the initial configuration in the GUI and just copy the file that is created. Then you have a good starting point.
    After you have done your initial configuration in the GUI you can copy it like this:

    cp /var/dhcpd/etc/dhcpd.conf /var/dhcpd/etc/dhcpd.conf.override

    OR, using the GUI, like this
    Go to Using Diagnostics -> Edit file:
    open /var/dhcpd/etc/dhcpd.conf
    then edit the filepath to /var/dhcpd/etc/dhcpd.conf.override and click Save
    And that’s all!
    Now you can edit dhcpd.conf.override with IP subnets, or anything you like.
    An example of dhcpd.conf with multiple subnets:
    option domain-name "localdomain";
    default-lease-time 7200;
    max-lease-time 86400;
    log-facility local7;
    ddns-update-style none;
    authoritative;
    
    #Subnet Alpha
    subnet 10.50.150.0 netmask 255.255.255.0 {
      pool {
        range 10.50.150.100 10.50.150.200;
      }
      option routers 10.50.150.3;
      option domain-name-servers 10.50.150.3;
    }
    
    #Subnet Delta
    subnet 10.18.200.0 netmask 255.255.255.0 {
      pool {
        range 10.18.200.100 10.18.200.200;
      }
      option routers 10.18.200.2;
      option domain-name-servers 10.50.150.3;# ex. a static IP address for a printer
    
      host HPPrinter { # example of a static IP address for a device
        hardware ethernet xx:xx:xx:xx:xx:xx; # replace the MAC address
        fixed-address 10.18.200.10;
        option host-name "HPLaserJet";
      }
    }
    
    NOTE!
    You’ll need to replace the xx:xx:xx…  with the actual MAC address of your device.
    And also;
    If you are doing this to create subnets, you will also need to enable DHCP relay on your switch or routers between these subnets.

    You can edit the override file from WebGui using the edit file menu.
    Đọc thêm..