Prevent SSL redirect loop using WordPress and HAProxy

This is a first post in a series on how to use HAProxy in front of WordPress. I’m using HAProxy to offload SSL connections to a WordPress site. The site itself runs on an internal IP address on port 80 while HAProxy listens on incoming connections on *:80 and *:443. Connections to *:443 will be presented the correct certificate using HAProxy’s SNI-based certificate matching algorithm. I’ll write more about that SNI-based configuration in a future post. In this post I’m going to focus on the SSL redirect loop which is happening if you use
define('FORCE_SSL_ADMIN', true);
and/or
define('FORCE_SSL_LOGIN', true);
in wp-config.php. Since HAProxy offloads the SSL connection, the web server running the WordPress site has no way to know the connection was SSL-based initially. Edit wp-config.php and add the following lines:
 define('FORCE_SSL_ADMIN', true);
define('FORCE_SSL_LOGIN', true);
if ($_SERVER['HTTP_X_FORWARDED_PROTO'] == 'https')
  $_SERVER['HTTPS']='on';
We’re telling WordPress that if an X-Forwarded-Proto header is present with the value https, the connection was initially based on SSL. Obviously, the X-Forwarded-Proto header has to be injected into the HTTP header of the request by HAProxy in the first place:
frontend ft_web_ssl
  mode http
  bind 0.0.0.0:443 ssl crt /etc/haproxy/certs.d
  reqadd X-Forwarded-Proto:\ https
  ...
  ...
Make sure to use option http-server-close as well or the reqadd setting might not work as expected.
Đọc thêm..

How to add a back-to-top button on your WordPress website

Landing website pages have been all the rage for a while now and although many of them come with a great design they can also come with a caveat: long body heights. This usually means that after users are done going through our awesome content they are forced into a scrolling sprint back to our website’s header in order to examine more navigation options (which also kinda means our landing page should have more interesting calls to action, but that’s a different story).
One way to mitigate this terrible experience and improve our website’s user friendliness would be to make our header sticky (which we’ll cover in another tutorial), but that’s something that’s not always desirable. Another way, one which we’ll cover in this tutorial, is to add a so-called “back to top” button which stays fixed as we scroll down and smoothly transitions us back to the very top when it gets clicked. This kind of “scroll to top” behavior is so necessary in some use-cases that iOS even has it embedded as a feature in pretty much the core of the OS (by tapping the status bar).
Let’s go ahead and see how simple it is to add this kind of functionality to any website with a simple button.

Our button’s requirements

We’re going to start, as always, by listing our requirements; what we need to accomplish. Thus, the button must:
  1. Appear only when the user has scrolled enough so that its existence is justified.
  2. Hide itself if the user manually scrolls up into that threshold again.
  3. Always remain visible after the threshold and follow along as the user scrolls.
  4. Get us smoothly back to the very top when it’s clicked.

Markup and styling

The HTML we’ll need is extremely simple: just a button element. Go ahead and open your WordPress (child) theme’s footer.php file and right before the body element closes add the following:
<button class="button-top"></button>
footer.php
Of course the icon is up to you, I chose a simple up arrow entity for brevity.
If we refresh the page right now we should see an ugly button sitting below our website’s footer, so let’s give it some style; in our (child) theme’s stylesheet:
.button-top {
  position: fixed;
  bottom: 20px;
  right: 20px;
  z-index: 100;
  width: 60px;
  height: 60px;
  border: 0;
  border-radius: 2px;
  box-shadow: none;
  background: #145474;
  color: #fff;
  font-size: 26px;
  line-height: 20px;
  text-align: center;
  cursor: pointer;
}
style.css
And here’s how it should look:
Pretty cool so far, but before we go any further let’s add a few more styles. We want to start by having the button hidden, and then we’ll define a new class which we’ll later enable via JavaScript and turn it back to visible.
.button-top {
  ...previous code
  pointer-events: none;
  opacity: 0;
  transition: opacity .18s ease;
}

.button-top-visible {
  opacity: 1;
  pointer-events: auto;
}
style.css

Making it functional

All righty, we’ve got our button styled and ready (and invisible), time to actually make it work. First thing we need to do is to actually make it smooth scroll back to the top when it’s clicked. Let’s add that code in our theme’s scripts file (make sure jQuery is loaded!):
jQuery(function ($) {
  var $buttonTop = $('.button-top');

  $buttonTop.on('click', function () {
    $('html, body').animate({
      scrollTop: 0,
    }, 400);
  });
});
scripts.js
Now every time the button is clicked, it’ll scroll us to the very top of our website within 400 milliseconds (feel free to adjust the timing to your liking).
If we hadn’t required that the button starts hidden we’d be done right now. But we want to show it only when the user has scrolled enough to actually be useful.
What we need for this is to tap into the scroll event of the browser’s window object and check if we’re scrolled enough from the top; if we are, we’ll add that .button-top-visible CSS class and show it. If we aren’t we’ll remove it (and consequently hide the button).
So, the actual event we’re after is probably the scroll event as the name implies, but how are we going to figure out how much we’ve scrolled so far? Let’s see what jQuery offers.
.scrollTop(): Get the current vertical position of the scroll bar for the first element in the set of matched elements.
Well, that sounds exactly what we need. Let’s amend our code and do just that.
jQuery(function ($) {
  var $window = $(window);
  var $buttonTop = $('.button-top');

  $buttonTop.on('click', function () {
    $('html, body').animate({
      scrollTop: 0,
    }, 400);
  });

  $window.on('scroll', function () {
    if ($window.scrollTop() > 100) { // 100 is our threshold in pixels
      $buttonTop.addClass('button-top-visible');
    } else {
      $buttonTop.removeClass('button-top-visible');
    }
  });
});
scripts.js
Perfect! Inside our scroll event listener we check for a simple condition, if we’re scrolled more than 100 pixels we’ll show the button, if not, we’ll hide it!

Advanced: Optimizing for performance

Our button is ready at this point, it fulfills all the requirements we’ve specified when we started, but I couldn’t possibly end this tutorial without bringing awareness to the fact that our code, although elegant, comes with a performance headache: the callback function we provide to the window’s scroll event listener is going to be called an inordinate amount of times, because the scroll event by nature is fired every time the scroll position changes (which is, again, a lot lot lot more than we need).
We don’t really need to check every millisecond or so. We’ll be good sports and debounce our function so that it gets called only once we’ve stopped scrolling and X amount of time (let’s say every quarter of a second) has passed since the last call.
A naïve, quick and dirty approach is the following:
jQuery(function ($) {
  var $window = $(window);
  var $buttonTop = $('.button-top');
  var scrollTimer;

  $buttonTop.on('click', function () {
    $('html, body').animate({
      scrollTop: 0,
    }, 400);
  });

  $window.on('scroll', function () {
    clearTimeout(scrollTimer);
    scrollTimer = setTimeout(function() {
     if ($window.scrollTop() > 100) {
        $buttonTop.addClass('button-top-visible');
      } else {
        $buttonTop.removeClass('button-top-visible');
      }         
    }, 250);
  });  
})
scripts.js
We’re not exactly debouncing here, but it comes very close, and with minimal code (credits go to css-tricks). In this iteration our check will run only once we’ve stopped scrolling and 250ms have passed since the last check.
For more advanced/robust usage you can use an actual debounce implementation like the one Underscore provides.
Here’s the final outcome (feel free to scroll and click):
And that’s it! We’re ready to add a simple back-to-top button to our WordPress (or any kind of) website! Feel free to post in the comments if you decide to add it on your own website or have already done so!

(https://www.cssigniter.com/add-back-top-button-wordpress-website/)
Đọc thêm..

How can I have a class of 'current' be displayed for the current post

<ul id="post-list">
    <?php
        global $post,$wp_query;
    $current_id = $wp_query->get_queried_object_id();
    $args = array('category_name'=>company,'numberposts' => -1);
    $myposts = get_posts( $args );
        foreach( $myposts as $post ) :  setup_postdata($post); ?>
            <li<?php if ($current_id == $post->ID) echo ' class="current"'; ?>>
            <a href="<?php the_permalink(); ?>"><?php the_title(); ?></a>
                </li>  
    <?php endforeach; ?>
</ul>
Đọc thêm..

Highlight Current Category Menu Item for WordPress Single Post

- Add to funtions.php
 
function sgr_show_current_cat_on_single($output) {
     global $post;
     if( is_single() ) {
          $categories = wp_get_post_categories($post->ID);
          foreach( $categories as $catid ) {
   $cat = get_category($catid);

        // Find cat-item-ID in the string
        if(preg_match('#cat-item-' . $cat->cat_ID . '#', $output)) {
             $output = str_replace('cat-item-'.$cat->cat_ID, 'cat-item-'.$cat->cat_ID . ' current-cat', $output);
        }
          }

     }
     return $output;
}

add_filter('wp_list_categories', 'sgr_show_current_cat_on_single');
 
- Add style.php 
 
.widget ul li.current-cat {
background-color: #26609b;
font-weight: bold;
}
Đọc thêm..

Change featured image urls in database

Im storing my images on another server and Ive managed to change the urls in the database but I cant seem to change the featured image urls?
I will not be adding any more images so I just want to change the url for all images.
This is the sql I used for normal images

UPDATE wp_posts SET post_content = REPLACE (post_content, 'src="http://www.oldsiteurl.com', 'src="http://newsiteurl.com');

and

UPDATE wp_posts SET  guid = REPLACE (guid, 'http://www.oldsiteurl.com', 'http://newsiteurl.com') WHERE post_type = 'attachment';

All the other images are fine except the featured images.
Đọc thêm..

Change and Update WordPress URLS in Database When Site is Moved to new Host

After migrating a WordPress site to a new URL either to a live production or a testing development server, the new URL strings in the mysql database need to be changed and updated in the various mysql database tables.
This method just uses the whole mysql database rather than a WordPress export/import from within, and is best suited for a straight swap. So you would copy all the WordPress files/folders to the new destination, set the correct ownership to those files,  then do the database switcheroo.

WordPress Database Switcheroo

First, do a mysql database export of the old database on the old server, create a new blank database on the new server, import the old data either in phpmyadmin or mysql directly in the command line.
Make sure you have the new database selected, then run some sql updates and replacement commands on the tables notably, wp_options, wp_posts, wp_postmeta.
Use the code as below and swap in your old and new URLs, no trailing slashes. Also if necessary change the table prefix values where applicable (ie wp_ )
UPDATE wp_options SET option_value = replace(option_value, 'http://www.oldurl', 'http://www.newurl') WHERE option_name = 'home' OR option_name = 'siteurl';

UPDATE wp_posts SET guid = replace(guid, 'http://www.oldurl','http://www.newurl');

UPDATE wp_posts SET post_content = replace(post_content, 'http://www.oldurl', 'http://www.newurl');

UPDATE wp_postmeta SET meta_value = replace(meta_value,'http://www.oldurl','http://www.newurl');

or via command line:

username@[~/Desktop]: mysql -u root -p databasename
Enter password:
Reading table information for completion of table and column names
You can turn off this feature to get a quicker startup with -A

Welcome to the MySQL monitor. Commands end with ; or g.
Your MySQL connection id is 892
Server version: 5.5.13 MySQL Community Server (GPL)

Copyright (c) 2000, 2010, Oracle and/or its affiliates. All rights reserved.

Oracle is a registered trademark of Oracle Corporation and/or its
affiliates. Other names may be trademarks of their respective
owners.

Type 'help;' or 'h' for help. Type 'c' to clear the current input statement.

mysql> UPDATE wp_options SET option_value = replace(option_value, 'http://www.oldurl', 'http://www.newurl') WHERE option_name = 'home' OR option_name = 'siteurl';
Query OK, 0 rows affected (0.00 sec)
Rows matched: 2 Changed: 0 Warnings: 0

mysql> UPDATE wp_posts SET guid = replace(guid, 'http://www.oldurl','http://www.newurl');
Query OK, 0 rows affected (0.02 sec)
Rows matched: 964 Changed: 0 Warnings: 0

mysql> UPDATE wp_posts SET post_content = replace(post_content, 'http://www.oldurl', 'http://www.newurl');
Query OK, 0 rows affected (0.05 sec)
Rows matched: 964 Changed: 0 Warnings: 0

mysql> UPDATE wp_postmeta SET meta_value = replace(meta_value,'http://www.oldurl','http://www.newurl');g
Query OK, 0 rows affected (0.01 sec)
Rows matched: 686 Changed: 0 Warnings: 0
 
Finally update your WordPress config file to reflect the new database, wp-config.php” which should be in your web document root – change, databasenameusernamepassword and host values:
 
define('DB_NAME', 'databasename');

/** MySQL database username */
define('DB_USER', 'username');

/** MySQL database password */
define('DB_PASSWORD', 'password');

/** MySQL hostname */
define('DB_HOST', 'localhost');
 
Now everything should link up perfectly. 
Đọc thêm..

How to show links in excerpt?

function new_trim_excerpt($text) {
        global $post;
        if ( '' == $text ) {
                $text = get_the_content('');
                $text = apply_filters('the_content', $text);
                $text = str_replace('\]\]\>', ']]>', $text);
                $text = preg_replace('@<script[^>]*?>.*?</script>@si', '', $text);
                $text = strip_tags($text, '<a>');
                $excerpt_length = 80;
                $words = explode(' ', $text, $excerpt_length + 1);
                if (count($words)> $excerpt_length) {
                        array_pop($words);
                        array_push($words, '</a><a>ID) . '">Read the Rest...</a>');
                        $text = implode(' ', $words);
                }
        }
        return $text;
}
remove_filter('get_the_excerpt', 'wp_trim_excerpt');
add_filter('get_the_excerpt', 'new_trim_excerpt');
Đọc thêm..

Multi excerpt in wordpress

function custom_excerpt($new_length = 20, $new_more = '...') {
  add_filter('excerpt_length', function () use ($new_length) {
    return $new_length;
  }, 999);
  add_filter('excerpt_more', function () use ($new_more) {
    return $new_more;
  });
  $output = get_the_excerpt();
  $output = apply_filters('wptexturize', $output);
  $output = apply_filters('convert_chars', $output);
  $output = '<p>' . $output . '</p>';
  echo $output;
}


Theme insert:

<?php custom_excerpt(10, ' ...') ?>
Đọc thêm..

Display Thumbnail and Excerpt for first post, other post no display


<?php $first = true; ?>
<?php query_posts('category_name=uncategorized&posts_per_page=3&order=DES'); ?>
<ul>
<?php if ( have_posts() ) : while ( have_posts() ) : the_post(); ?>
<li>
    <?php if ( $first ): ?>
         <div class="img">
            <a href="<?php the_permalink(); ?>"><?php the_post_thumbnail('thumb-header'); ?></a>
        </div>
        <?php endif; ?>
<div class="title-widget">
    <a  href="<?php the_permalink(); ?>"><?php the_title(); ?></a>
</div>

    <?php if ( $first ): ?>
        <div class="des-widget">
            <?php custom_excerpt(10, ' ...') ?>
        </div>
          <?php $first = false; ?>
        <?php endif; ?>

</li>
<?php endwhile; ?>
<?php endif; ?>
</ul>
Đọc thêm..

How do I get the text value of a selected option?

How do I get the text value of a selected option?

Select elements typically have two values that you want to access. First there's the value to be sent to the server, which is easy:
1
2
$( "#myselect" ).val();
// => 1
The second is the text value of the select. For example, using the following select box:
1
2
3
4
5
6
7
<select id="myselect">
<option value="1">Mr</option>
<option value="2">Mrs</option>
<option value="3">Ms</option>
<option value="4">Dr</option>
<option value="5">Prof</option>
</select>
If you wanted to get the string "Mr" if the first option was selected (instead of just "1") you would do that in the following way:
1
2
$( "#myselect option:selected" ).text();
// => "Mr"
Đọc thêm..

Wordpress - Add lightbox to feature image

File single-<name>.php or single.php

change:

<?php
                if(has_post_thumbnail())  {

                    the_post_thumbnail(
                        array($theme->get_option('featured_image_width_single'), $theme->get_option('featured_image_height_single')),
                        array("class" => $theme->get_option('featured_image_position_single') . " featured_image")
                    ); };
?>

to:


<a rel="lightbox" href="<?php $image_id = get_post_thumbnail_id();
                        $image_url = wp_get_attachment_image_src($image_id,'thumb-medium', true);
                        echo $image_url[0];  ?>">
                        <?php the_post_thumbnail(
                        array($theme->get_option('featured_image_width_single'), $theme->get_option('featured_image_height_single')),
                        array("class" => $theme->get_option('featured_image_position_single') . " featured_image" )
                    ); }; ?>
 </a>

Đọc thêm..

Kích hoạt các nút soạn thảo ẩn trong WordPress

Trong khung soạn thảo WordPress mặc định nó chỉ hiển thị một vài nút bấm như chọn thẻ Heading, căn lề chữ, in đậm, in nghiêng, link,…nhưng bạn có thể thấy nó bị thiếu khá nhiều nút mà có thể bạn cần như kiểu font chữ, kích thước chữ,……Điều này có thể làm một vài người mới dùng WordPress không hài lòng nếu muốn bài viết trang trí độc đáo hơn.
Các nút bấm mặc định trong bộ soạn thảo của WordPress
Để kích hoạt các nút ẩn đó, bạn có thể dùng các plugin hỗ trợ thêm nhiều nút bấm khác như Advanced TinyMCE là một ví dụ, nhưng có lẽ sử dụng plugin không phải là lựa chọn tốt cho nhiều người.
Vậy chúng ta có thể thêm các nút mới vào khung soạn thảo WordPresskhông cần dùng plugin không? Hoàn toàn có thể.
Bộ soạn thảo Visual của WordPress sử dụng thư viện mở TinyMCE, thư viện này hỗ trợ rất nhiều nút bấm rất chuyên nghiệp nhưng để cho người dùng dễ tiếp cận, không bị rối nên WordPress đã cố tính giấu chúng đi và những lập trình viên có thể tìm cách cho nó hiển thị nếu cần.
Để kích hoạt các nút ẩn, bạn chỉ cần chèn đoạn sau vào file functions.php trong theme:

function ilc_mce_buttons($buttons){
  array_push($buttons,
     "backcolor",
     "anchor",
     "hr",
     "sub",
     "sup",
     "fontselect",
     "fontsizeselect",
     "styleselect",
     "cleanup"
);
  return $buttons;
}
add_filter("mce_buttons", "ilc_mce_buttons");
 

Nếu bạn muốn các nút nó xuống hàng, thì hãy thay hook mce_buttons thành mce_buttons_2 hoặc mce_buttons_3 hoặc mce_buttons_4.
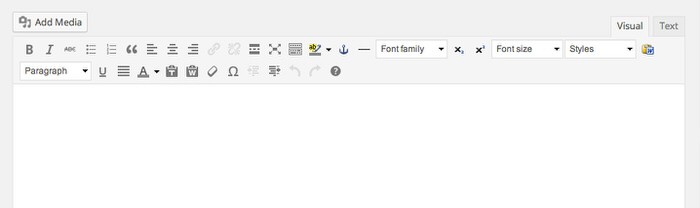
Khi thêm xong, bạn sẽ thấy khung soạn thảo trở thành như thế này:
wp-full-visual
Quá dễ dàng và đơn giản phải không nào, bây giờ bạn có thể tha hồ soạn bài viết với các công cụ đầy đủ hơn mà không cần cài plugin.
Đọc thêm..

Simplecart.js Check if Simplecart_Items has items

You can try this way in V3 of the simplecartjs script,
if(simpleCart.items().length == 0)
{
//No items in the cart
}
If you want to check a particular item already present in the cart, using jQuery.
simpleCart.bind('beforeAdd', function (item) {
  if (simpleCart.has(item)) 
  {
      alert("Already in the Cart");
      return false;
  }
});
Đọc thêm..

Tạo nút Back to Top với hiệu ứng từ jQuery

Cách 1:

Chèn đoạn code sau phía trên </body> trong file footer.php:

<style type='text/css'>
#bttop{border:1px solid #4adcff;background:#24bde2;text-align:center;padding:5px;position:fixed;bottom:35px;right:10px;cursor:pointer;display:none;color:#fff;font-size:11px;font-weight:900;}
#bttop:hover{border:1px solid #ffa789;background:#ff6734;}
</style>
<div id='bttop'>BACK TO TOP</div>
<script src='http://ajax.googleapis.com/ajax/libs/jquery/1.3.2/jquery.min.js' type='text/javascript'></script>
<script type='text/javascript'>$(function(){$(window).scroll(function(){if($(this).scrollTop()!=0){$('#bttop').fadeIn();}else{$('#bttop').fadeOut();}});$('#bttop').click(function(){$('body,html').animate({scrollTop:0},800);});});</script>

Cách 2:
- Chèn đoạn code sau phía trên </body> trong file footer.php:
<script type="text/javascript">
        $(document).ready(function() {
            $('body').append('<div id="backtotop">^Top</div>');
           $(window).scroll(function() {
            if($(window).scrollTop() >200) {
                $('#backtotop').fadeIn();
            } else {
                $('#backtotop').fadeOut();
            }
           });
           $('#backtotop').click(function() {
            $('html, body').animate({scrollTop:0},500);
           });
        });</script>

- Thêm vào file css 
 
 #backtotop {
background: url("images/scroll-top.png") no-repeat scroll left top #666666;
width: 29px;
height: 29px;
position: fixed;
bottom: 50px;
right: 50px;
cursor: pointer;
border-radius: 30px;
}
 
Đọc thêm..

Add .html extension to wordpress permalinks for posts/pages

There are many time that you want to add different permalinks to your wordpress site, maybe you have some other cms and you want to transfer to wordpress, and your previous blogging platform has some other permalink structure and you want to make sure that your new blog has the same extension type. Or you want to beautify your linking structure. To achieve that wordpress gives you 5 predefined options in permalink, along with that you can custom define permalink structure like you want.
1) Default http://example.com/?p=123
custom structure blank
2) Day and name http://example.com/2015/03/21/sample-post/
custom structure /%year%/%monthnum%/%day%/%postname%/
3) Month and name http://example.com/2015/03/sample-post/
custom structure /%year%/%monthnum%/%postname%/
4) Numeric http://example.com/archives/123
custom structure /archives/%post_id%
5) Post name http://example.com/sample-post/
custom structure /%postname%/
If you are not satisfied with these options or want your site to have different linking structure then there are other ways to do custom permalinks.

Adding .html to posts

Add the following code to custom structures in permalink.
1) Day and name http://example.com/2015/03/21/sample-post/
custom structure /%year%/%monthnum%/%day%/%postname%.html
2) Month and name http://example.com/2015/03/sample-post/
custom structure /%year%/%monthnum%/%postname%.html
3) Numeric http://example.com/archives/123
custom structure /archives/%post_id%.html
4) Post name http://example.com/sample-post/
custom structure /%postname%.html

Adding .html to pages

Adding .html extension to pages requires some hack into the theme function.php file. You would need to add the following code to the function.php file.
add_action('init', 'change_page_permalink', -1);
function change_page_permalink() {
    global $wp_rewrite;
    if ( strstr($wp_rewrite->get_page_permastruct(), '.html') != '.html' )
        $wp_rewrite->page_structure = $wp_rewrite->page_structure . '.html';
        $wp_rewrite->flush_rules();
}
Đọc thêm..

Checking the form field values before submitting that page

function checkform() 
{
if(document.frmMr.name.value == "" || document.frmMr.email.value == "") 
{
    alert("please enter info");
    return false;
}
else
{
    document.frmMr.submit();
}
}

<html>
<form name=frmMr action="page1.jsp" >
Enter Start date:
<input type="text" size="15" name="name" id="name">
<input type="text" size="15" name="email" id="email"> 
<input type="submit" name="continue" value="submit" onClick="checkform();">
</form>
</html>
 
 
Đọc thêm..

Insert WordPress Page Content Anywhere You Like in Your Site

If you need to insert content from a Page into other places in your site, such as in a sidebar or a category page, then that’s easily done with this little trick I discovered from Scott Nelle.
As Scott mentions, he does this for clients so that they can easily add content to a sidebar. He just creates a Page and labels it so that they know that’s the Page they need to edit to change their content area in the sidebar.
Pretty smart, if you ask me. They don’t need to know where the widgets are, for example, or even what a widget is. Just tell them, “Edit the ‘Sidebar Page’ if you want to change the content in this area.”

Featured Plugin - WordPress Appointments Plugin

Take, set and manage appointments and client bookings without having to leave WordPress. Appointments+ makes it easy.
Find out more

How To Do This

First, you’ll need to create a Page (not a Post) with the content want in it. You will then need to find the ID of the Page. If you aren’t sure how to do that, here’s one way.
Next, put the following code where you’d like your Page content to show up (such as in a sidebar):
<?php
 $id = ID#;
 $p = get_page($id);
 echo apply_filters('the_content', $p->post_content);
 ?>
You will need to insert your actual Page ID in the spot that says ID# above. So, for example, if I find out that my page ID is 14, my code in that section will look like this:
$id = 14;
After that, you may need to do some styling, depending on your layout and how you want things to work, but that’s it really. You can now go back and edit the page you created, and it will change the content wherever you’ve put your code for it.


Taking It a Little Further

I found the code above recently when I was looking to do something similar, though my situation was just slightly more complicated. I’ll go ahead and go over my situation as it may spur ideas for you to use this type of code in your own ways.
In my situation, I needed to put different content into different category templates.
In other words, I needed to be able to write up some editable content and images, and then insert them in a special place on my Blue Category page, for example. Then I needed to do the same thing for my Red Category, Yellow Category, and Green Category Pages.
I’ll try to represent that graphically.

Featured Plugin - WordPress Facebook Plugin

Would you like to add Facebook comments, registration, 'Like' buttons and autoposting to your WP site? Well, The Ultimate Facebook plugin has got that all covered!
Find out more

The Solution

The solution was to use the code mentioned at the beginning of the post but to also use category templates. You can learn about creating category templates here.
As demonstrated above, I created a Page and then got the ID for it. (Let’s say the ID was 5.) This was content for my Blue Category.
I then created a Blue Category template (category-blue.php), placed the code above into the template where I wanted the content to appear, and put my Page ID into the correct spot so it looked like this:
<?php
 $id = 5;
 $p = get_page($id);
 echo apply_filters('the_content', $p->post_content);
 ?>

And that was it. My Blue Category was set.
Then I moved on and made my Red Category content by creating a NEW Page. I got the ID for that (ID = 6). And then I created a Red Category template (category-red.php) and put my code in. It looked like this:
<?php
 $id = 6;
 $p = get_page($id);
 echo apply_filters('the_content', $p->post_content);
 ?>

And on and on I went for all the different categories I wanted this for. Now, as you can see, I can easily go into my newly created Pages and update/change the inserted content for different categories.
If I want to change the inserted content on my Blue Category page, I just go to the Page I created for that and work in the editor, which is much easier than digging into the category templates and working with raw HTML, for example. In the editor, it’s easy to insert pretty much whatever you like – text, images, videos, etc.
So there you go — next time you wish you had an easily editable area somewhere on your site, you might remember this little trick of pulling in Page content wherever you like.

Featured Plugin - WordPress Pop-Up Chat Plugin

No javascript required, no third part chat engine, just fully featured chat right in your own database on your own WP sites - couldn't be easier.
Find out more

(http://premium.wpmudev.org/)
Đọc thêm..

Add WordPress Widgets to Pages or Posts + Dynamic About Pages

Have you ever been writing a post or a page and caught yourself thinking, “Man, I wish I could just pop a widget into this spot right here.”
OK, maybe you haven’t. But consider the possibilities – all the wild and wonderful things you can get widgets to do, yet getting them to do those things inside of individual posts or pages.

Dynamic Content

While you can put almost anything in a widget, of course, perhaps one of the biggest advantages to having a widget in a post or a page is that it can contain dynamic content – in other words, content that updates automatically.
With this in mind, one of the first things that came to my mind was to have a dynamically updating About page. And so we’ll show an example of how you might do that. But first we’ll introduce the plugin that makes widgets on a post or page possible.

Featured Plugin - WordPress Facebook Plugin

Would you like to add Facebook comments, registration, 'Like' buttons and autoposting to your WP site? Well, The Ultimate Facebook plugin has got that all covered!
Find out more

Widgets on Pages Plugin (Download Here)

The Widgets on Pages plugin is simple and straight-forward to set up.
On the settings page, you can add as many widgets as you like. In this example, I’ve added six more to the original default widget for a total of seven widgets. (You don’t need to name them.)
Once you add your widgets, you will see widget spaces automatically added on your widgets set up page. (Appearance > Widgets)

From there you just drop whichever widgets you want into the widget spaces, and then call the widget in your posts or pages with a shortcode, such as [widgets_on_pages id=1] for the first widget area, [widgets_on_pages id=2] for the second widget area, etc.

Featured Plugin - WordPress Q&A Site Plugin

It's now incredibly easy to start your own Q&A site using nothing more than WordPress - The Q&A plugin simply and brilliantly transforms any site, or page, into a perfect support or Q&A environment.
Find out more

Making a Dynamic About Page

To give an example of how you might put this to work, I’ll quickly run through a dynamic About page I set up.
Most About pages are fairly static, of course. You write it once and then pretty much forget about it unless you have a major update for it. But if you’d really like people to know about you, then it would help if your About page showed what you’ve been up to recently via social media sites such as Twitter, Facebook, YouTube, Flickr, LinkedIn, etc.
There are tons of widgetized plugins for all of those sites, of course, and so if you could just drop a widget for each into your About page, then it would be automatically updated constantly.

Styling the Page

The Widgets on a Page plugin allows you to do some very creative stuff; however, it doesn’t come with many styling options. In fact, it only comes with the ability to turn styling off so that that your in-page widgets don’t take the style of a widget in your actual sidebar if you don’t want them to.
And so to make a somewhat more visually appealing About page, I decided to use another plugin that I wrote about before that would help me easily control the elements on the page. You can find instructions for using that plugin here – WP Easy Columns plugin post.
Essentially what the Easy Columns plugin allows you to do is divide your post or page into columns. And then inside of those columns, all I did was add my shortcodes from theWidgets on a Page plugin.

Featured Plugin - WordPress Membership Site Plugin

If you're thinking about starting a paid, or just private, membership site then this is truly the plugin you've been looking for. Easy to use, massively configurable and ready to go out of the box!
Find out more

Plugins for My Widget Areas

I used four plugins for this page – a social media plugin, a YouTube plugin, a Twitter plugin, and a Flickr plugin. (As I didn’t test these plugins thoroughly, I won’t make specific recommendation; however, you should have no problems finding plugins to work for you.)
I put a short biography section and a picture at the top. Underneath that, I then pulled in the social media connection widget.
Under the social media icons, I then simply divided the page into three columns and put a shortcode into each column for my three remaining plugins/widgets: the YouTube plugin, the Twitter plugin, and the Flickr plugin.
Here’s the result – a dynamic About page:

Literally Almost No Limits

The About page above is just one small example of what you can do.
When you have any WordPress widget you like at your fingertips, and you’re able to insert it into any post or page, the old cliché of “the sky’s the limit” becomes about as true as it can get with WordPress.
Again, you can download the plugin here: http://wordpress.org/extend/plugins/widgets-on-pages/

Featured Plugin - WordPress Newsletter Plugin

Now there's no need to pay for a third party service to sign up, manage and send beautiful email newsletters to your subscriber base - this plugin has got the lot.
Find out more

(http://premium.wpmudev.org/)
Đọc thêm..