DejaDup - Backup Tools for Linux
https://apps.gnome.org/DejaDup/

DejaDup - Backup Tools for Linux
https://apps.gnome.org/DejaDup/
Ásbrú Connection Manager like PAC
https://www.asbru-cm.net/
- Instal Printer Driver HP on arch linux:
sudo pacman -S cups
systemctl enable cups && systemctl start cups
sudo pacman -S system-config-printer
sudo pacman -S hplip-plugin
yay -S hpuld
- Config Printer
sudo hp-setup -i <IP Printer>
- Install scanner:
sudo pacman -S sane
yay -S xsane
- Config print pdf file to printer
lpadmin -p <Printer_name> -o pdftops-renderer-default=pdftops
- Printer manager over web:
https://localhost:631
user/pass is on system
Sometimes, when you are executing a file transfer between your computer hard drive and an external drive and your computer shutdown for some reason (in my case, no battery/ac power) it’s pretty common to get some errors on external drives that uses NTFS as they file system.
The most common message is:
Error mounting: mount exited with exit code 13: $MFTMirr does not match $MFT (record 0).
Failed to mount ‘/dev/sdb3’: Input/output error
NTFS is either inconsistent, or there is a hardware fault, or it’s a
SoftRAID/FakeRAID hardware. In the first case run chkdsk /f on Windows
then reboot into Windows twice. The usage of the /f parameter is very
important! If the device is a SoftRAID/FakeRAID then first activate
it and mount a different device under the /dev/mapper/ directory, (e.g.
/dev/mapper/nvidia_eahaabcc1). Please see the ‘dmraid’ documentation
for more details.
One workaround for this issue is to do as the message says, boot on Windows and try to use the awesome NTFS tool that Windows offer. But a perfect solution for a Linux users is to use the ntfsprogs utility.
UPDATE: On some recent Linux releases, you need to install ntfs-3g utilties. Try sudo apt-get install ntfs-3g or download from http://www.tuxera.com/community/ntfs-3g-download/
ntfsprogs is a suite of NTFS utilities based around a shared library. The tools are available for free and come with full source code.
- mkntfs: Create an NTFS volume on a partition
- ntfscat: Print a file on the standard output
- ntfsclone: Efficiently backup/restore a volume at the sector level
- ntfscluster: Given a cluster, or sector, find the file
- ntfsfix: Forces Windows to check NTFS at boot time
- ntfsinfo: Dump a file’s attributes, completely
- ntfslabel: Display or set a volume’s label
- ntfslib: Move all the common code into a shared library
- ntfsls: List directory contents
- ntfsresize: Resize an NTFS volume
- ntfsundelete: Find files that have been deleted and recover them
- ntfswipe: Write zeros over the unused parts of the disk
- ntfsdefrag: Defragment files, directories and the MFT
- ntfsck: Perform consistancy checks on a volume
- nttools: Command-line tools to view/change an offline NTFS volume, e.g. ntfscp, ntfsgrep, ntfstouch, ntfsrm, ntfsrmdir, ntfsmkdir
- ntfsdiskedit: Walk the tree of NTFS ondisk structures (and alter them)
Be careful with these utilities, they might damage the filesystem, or your hard disk !
With ntfsprogs installed (sudo apt-get install ntfsprogs) you should execute the following commands in a terminal:
sudo ntfsfix /dev/partitionName
After this command you should expect the following output:
~$ sudo ntfsfix /dev/sdb3

Mounting volume... FAILED

Attempting to correct errors...

Processing $MFT and $MFTMirr...

Reading $MFT... OK

Reading $MFTMirr... OK

Comparing $MFTMirr to $MFT... FAILED

Correcting differences in $MFTMirr record 0...OK

Processing of $MFT and $MFTMirr completed successfully.

Setting required flags on partition... OK

Going to empty the journal ($LogFile)... OK

NTFS volume version is 3.1.

NTFS partition /dev/sdb3 was processed successfully.
After this step you should be able to access your external drive partition as usual, mount or use nautilus to access your files.
Source: http://gnuwin32.sourceforge.net/packages/ntfsprogs.htm
https://wmarkito.wordpress.com/2010/12/29/how-to-fix-mftmirr-does-not-match-mft-record-0/
In this article, we will show how to fix NTFS failed to mount errors such as “Failed to mount ‘/dev/sdax’: Input/output error, NTFS is either inconsistent, or there is a hardware fault, or it’s a SoftRAID/FakeRAID hardware”.
The following screenshot shows an example of an NTFS failed to mount error.

To fix this error, you can use ntfsfix, a tiny and useful utility that fixes some common NTFS problems. A ntfsfix is part of the ntfs-3g package (an open-source implementation of NTFS) and it repairs several fundamental NTFS inconsistencies, resets the NTFS journal file, and schedules an NTFS consistency check for the first boot into Windows.
To run it on our computer, you need to install the ntfs-3g package as follows.
----------- On Debian, Ubuntu & Mint -----------
$ sudo apt-get install ntfs-3g

----------- On RHEL, CentOS & Fedora -----------
$ sudo yum install epel-release
$ sudo yum install ntfs-3g
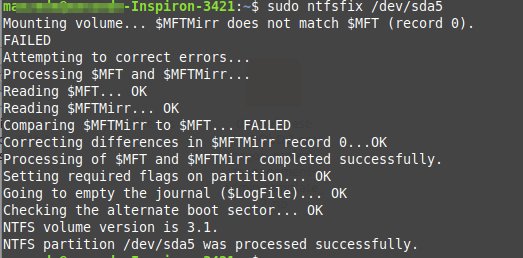
Once you have the ntfs-3g package installed, run the ntfsfix command, provide the NTFS partition that has issues as an argument as shown.
$ sudo ntfsfix /dev/sda5
To perform a dry-run where ntfsfix doesn’t write anything but only shows what would have been done, use the -n or --no-action option.
$ sudo ntfsfix -n /dev/sda5
A ntfsfix has another useful switch -b or --clear-bad-sectors for clearing the list of bad sectors. This feature is particularly useful after cloning an old disk with bad sectors to a new disk.
$ sudo ntfsfix -b /dev/sda5
Also, ntfsfix supports clearing the volume dirty flag if the volume can be fixed and mounted. You can invoke this feature bypassing the -d option as shown.
$ sudo ntfsfix -d /dev/sda5
A nftsfix is a useful tool for fixing some common NTFS problems.
https://www.tecmint.com/fix-ntfs-partition-failed-to-mount-error/