How to Increase VMware Virtual Disk Size LVM


Introduction:

In this post, I will explain how to expand disk space on a Linux system using Logical Volume Manager (LVM). Whether you’re dealing with a physical or virtual disk, this step-by-step tutorial will help you make the most of your storage without the need for a system reboot.

Step 1: Increase Disk Size

The first step is to increase the size of the disk that your Linux OS uses. This can be done by expanding the virtual disk in virtualization platforms like VMWare, KVM or Hyper-V. For this post, we’ll extend a 16 GB disk to 30 GB.

My Lab Details:

Hypervisor: VMware ESXi
VM: Ubuntu 22.04.1 LTS
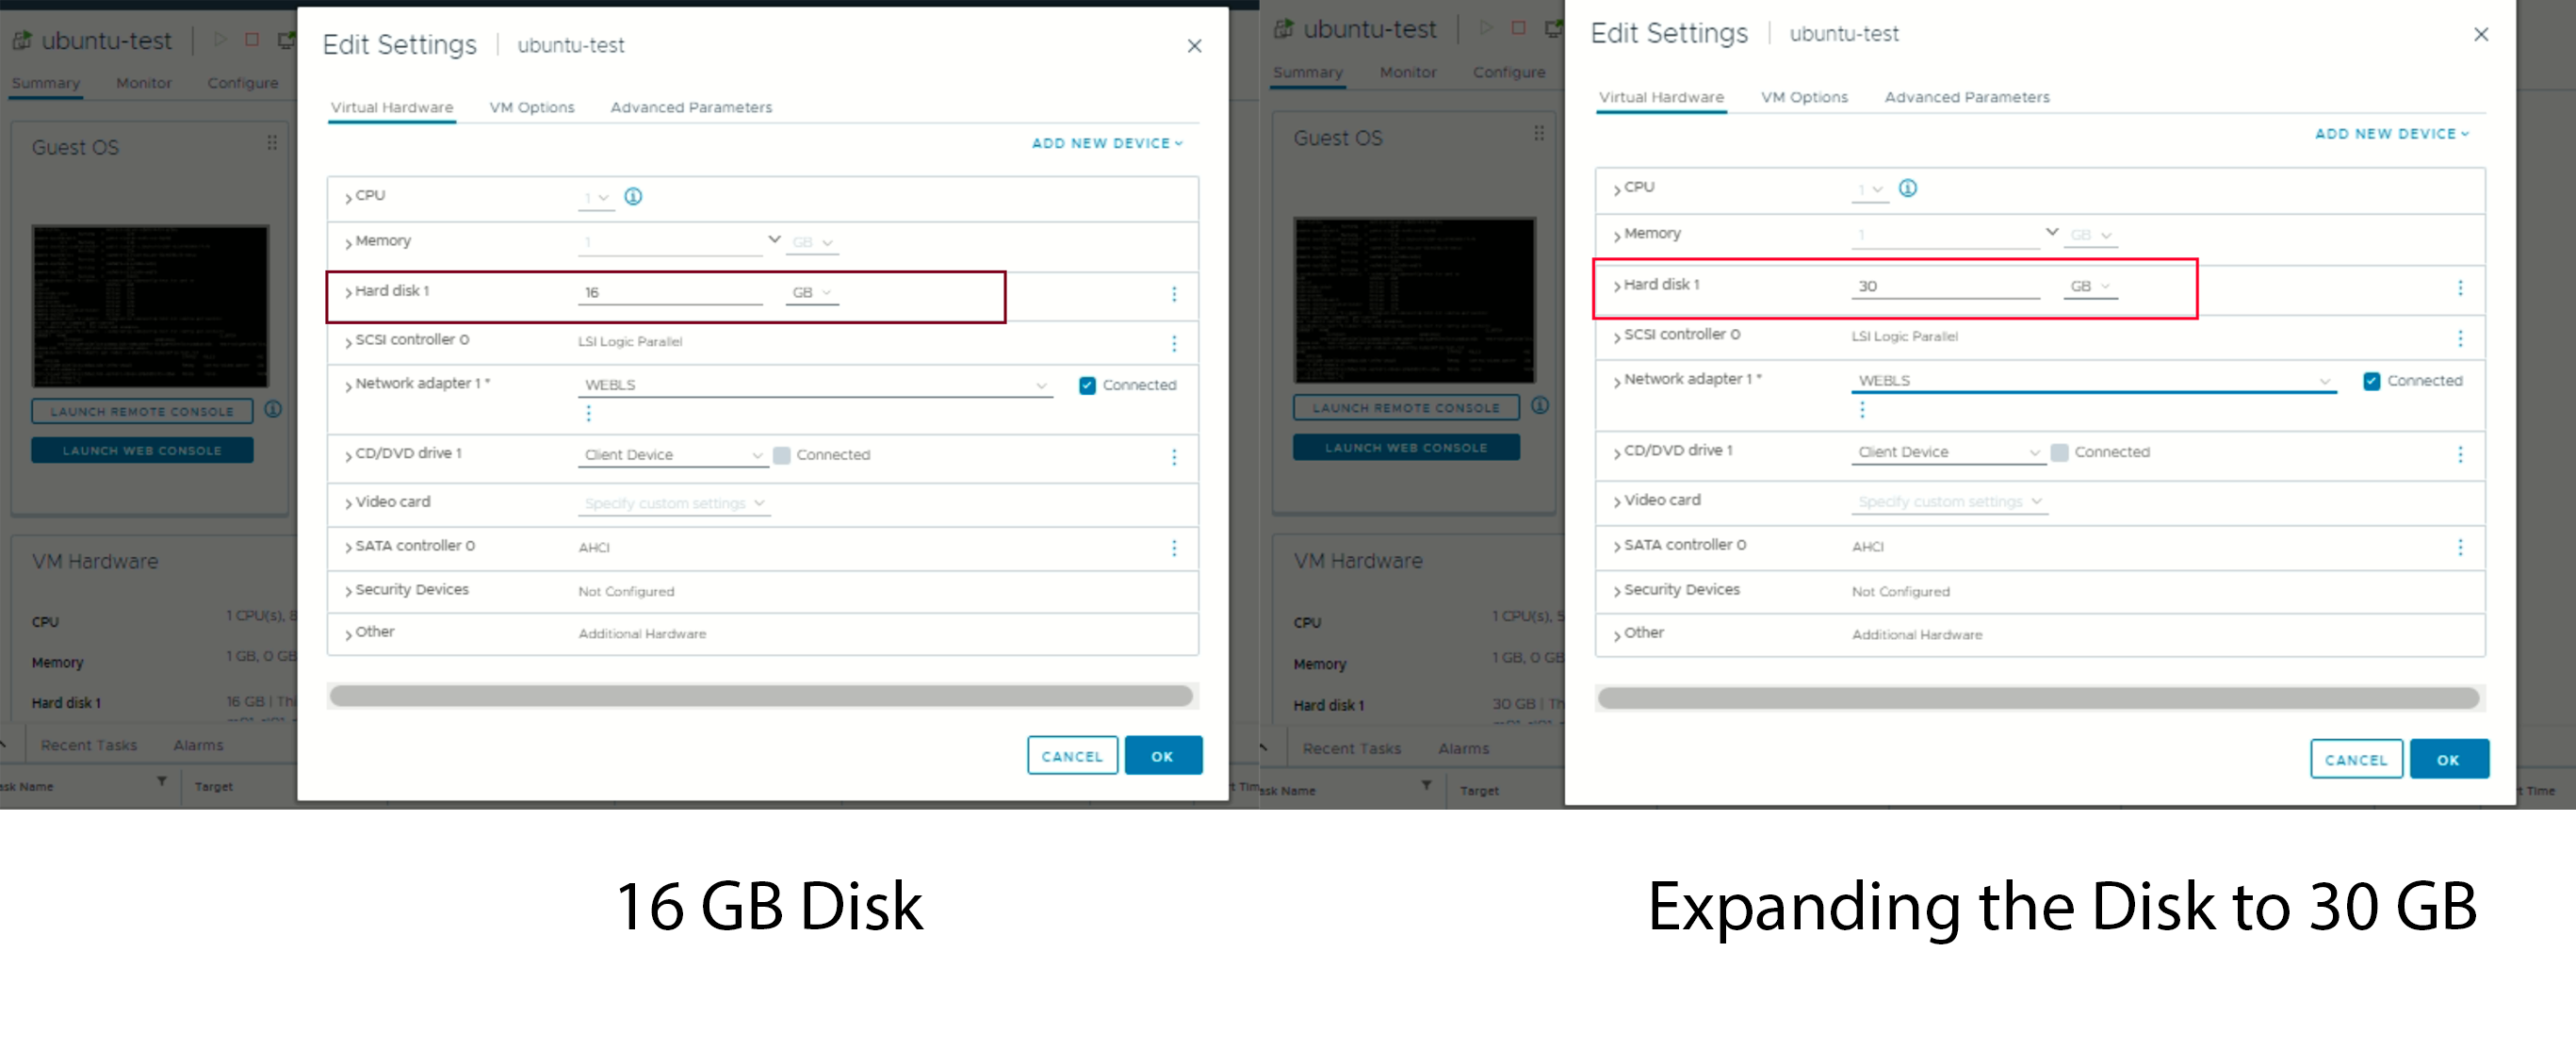
expand-disk

root@ubuntu-test:~# df -h
Filesystem                         Size  Used Avail Use% Mounted on
tmpfs                               98M  1.3M   96M   2% /run
/dev/mapper/ubuntu--vg-ubuntu--lv  9.8G  6.7G  2.6G  73% /
tmpfs                              486M     0  486M   0% /dev/shm
tmpfs                              5.0M     0  5.0M   0% /run/lock
/dev/sda2                          1.7G  247M  1.4G  16% /boot
tmpfs                               98M  4.0K   98M   1% /run/user/1000

Disk is still not visible/listed

Step 2: Rescan the Disk

After resizing the disk, you may need to prompt Linux to recognize the additional free space. To check for free space, run the cfdisk command and see if it lists free space. Use “q” to exit when done. If there’s no free space listed, initiate a rescan for /dev/sda with the command:

echo 1 > /sys/class/block/sda/device/rescan

Stage 2: Modify the partition within the VM

(Note: It is time to stop, if you have not backup all your data, or if you are not sure about what you are doing.)

Step 6: type the following command, find Disk /dev/sda, and confirm the size (of step 3).

$ sudo fdisk -l

Step 7: Run the command

$ sudo fdisk /dev/sda

Step 8: Type 'p' to check the partition info.

(Warning: if you have more than one partitions, STOP using this guide.)

Step 9: Type 'd' to delete Partition 1.

Step 10: Type 'p', and confirm the changes

Step 11: Type 'n', hit 'Enter' 4 times to use defaults ([Partition type], [Partition number], [first sector], and [last sector]), and type 'n'. (You might not need the last 'n'.)

Note: Chose [N]

Partition #3 contains a LVM2_member signature.

Do you want to remove the signature? [Y]es/[N]o: n


Step 12: Type 'p', confirm the changes, and then type 'w'

Step 13: Restart the virtual machine.

Stage 3: Resize the disk space within the VM

Step 14: Run following command

$ sudo resize2fs /dev/sda1


Step 4: Extend the Physical Volume (PV)

With the LVM partition backing up the /dev/sda3 PV extended, it’s time to extend the PV itself.

Run

pvresize /dev/sda3

to accomplish this, and then use pvdisplay to verify the new size. In our example, the PV has increased from 14.2GB to 28.2G.

Step 5: Check Volume Group (VG) Free Space

Now, check the VG’s free space using vgdisplay. In our case, there’s 18.25 GiB of free space available within the VG.
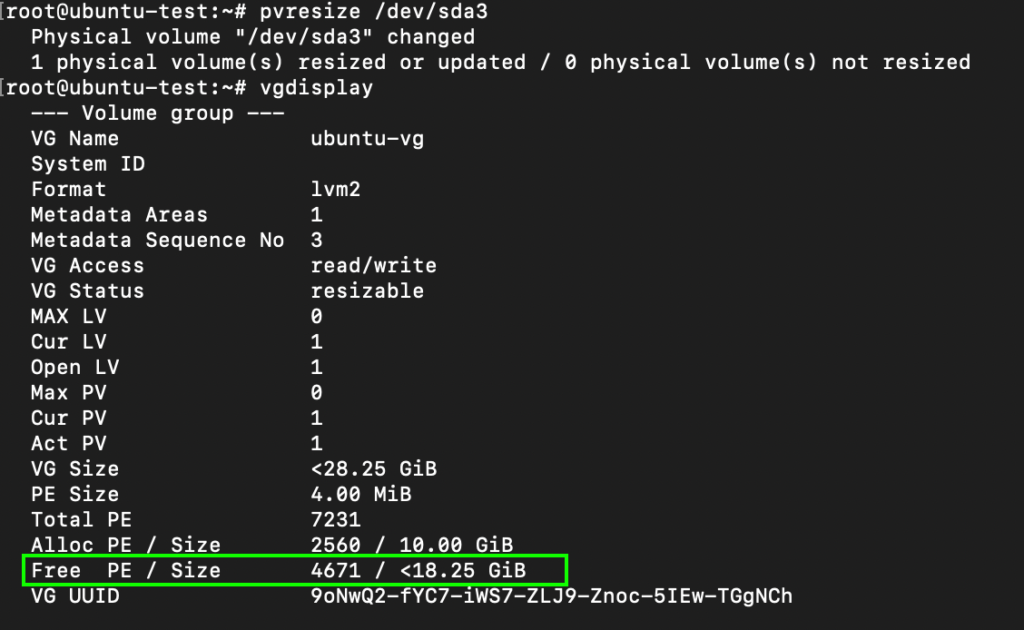
Step 6: Extend Logical Volume (LV)

Use lvdisplay to verify the size of your upstream Logical Volume (LV). Extend the LV to use all available VG free space with the below command

lvextend -l +100%FREE /dev/ubuntu-vg/ubuntu-lv

Check the LV one more time with lvdisplay to ensure it’s been extended.

root@ubuntu-test:~# lvextend -l +100%FREE /dev/ubuntu-vg/ubuntu-lv
  Size of logical volume ubuntu-vg/ubuntu-lv changed from 10.00 GiB (2560 extents) to <28.25 GiB (7231 extents).
  Logical volume ubuntu-vg/ubuntu-lv successfully resized.
root@ubuntu-test:~# lvdisplay
  --- Logical volume ---
  LV Path                /dev/ubuntu-vg/ubuntu-lv
  LV Name                ubuntu-lv
  VG Name                ubuntu-vg
  LV UUID                xL1oCY-qBRL-cT86-jRRr-0cWK-0P4W-U0Y1Dp
  LV Write Access        read/write
  LV Creation host, time ubuntu-server, 2023-04-12 11:44:17 +0000
  LV Status              available
  # open                 1
  LV Size                <28.25 GiB
  Current LE             7231
  Segments               1
  Allocation             inherit
  Read ahead sectors     auto
  - currently set to     256
  Block device           253:0

Step 7: Resize the File System

At this point, the block volume supporting your root filesystem has been expanded, but the filesystem itself needs resizing. Run df -h to check the current filesystem size. Use the below command to resize it, and run df -h once more to confirm the new available space.
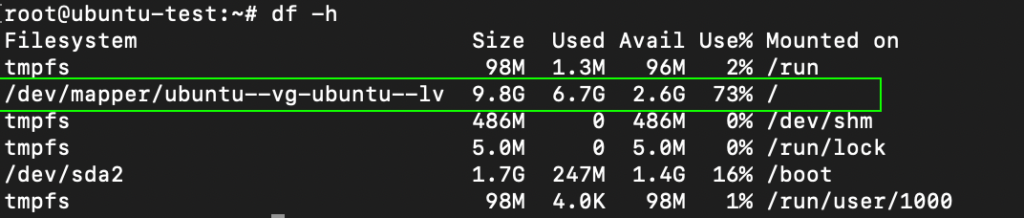
resize2fs /dev/mapper/ubuntu--vg-ubuntu--lv 
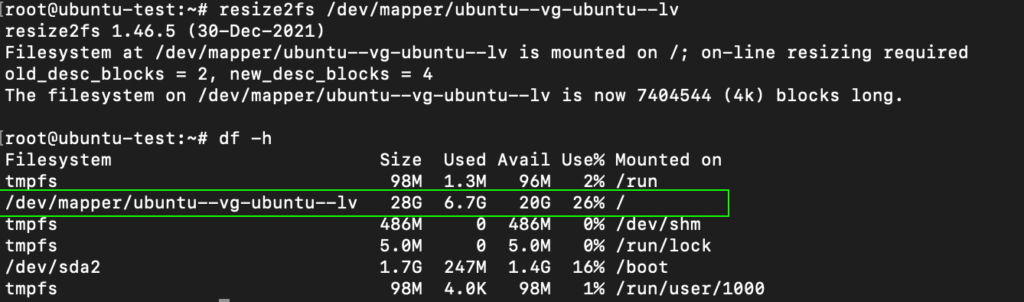
Following the above steps, you can successfully expand your Linux Machine/VM physical or virtual disk space using LVM. This allows you to efficiently manage your storage resources and accommodate growing storage needs without disrupting your system. Hope this helps.

Đọc thêm..

Backup - Restore Remmina on Ubuntu


Installed Remmina on Ubuntu 16.04 and had to reinstall Ubuntu after a while because it wasn't running the best. On my first install, the location of all the Remmina connection files was /home/$USER/.local/share/remmina/ folder ($USER is the current user).

After I reinstalled my new setup of Ubuntu put all the connection files in the same location /home/$USER/.local/share/remmina/ and started up Remmina I had no connection. After reading this post, I created a new connection and seen a new folder created under /home/$USER/.remmina/ with that connection, so I copied all my connections into that folder /home/$USER/.remmina/.

sudo cp -r /home/$USER/.local/share/remmina/* /home/$USER/.remmina/
Đọc thêm..

ibus-bamboo

- Install ibus-bamboo

echo 'deb http://download.opensuse.org/repositories/home:/lamlng/Debian_11/ /' | sudo tee /etc/apt/sources.list.d/home:lamlng.list curl -fsSL

 https://download.opensuse.org/repositories/home:lamlng/Debian_11/Release.key | gpg --dearmor | sudo tee /etc/apt/trusted.gpg.d/home_lamlng.gpg > /dev/null sudo 

apt update

sudo apt install ibus-bamboo


vi /etc/environment
export GTK_IM_MODULE=ibus
export XMODIFIERS=@im=ibus
export QT_IM_MODULE=ibus

Đọc thêm..

Install XRDP on Linux

 - Install XRDP on Linux:

sudo apt install xrdp 

sudo systemctl status xrdp

sudo adduser xrdp ssl-cert 

sudo apt install xfce4 xfce4-goodies xorg dbus-x11 x11-xserver-utils

- Config file:

/etc/xrdp/sesman.ini 

/etc/xrdp/startwm.sh

/etc/X11/Xsession

Đọc thêm..

How to Kill Zombie Processes in Ubuntu


Use the ps command. I almost always use ps auxwww.

$ ps auxwww
USER       PID %CPU %MEM      VSZ    RSS   TT  STAT STARTED      TIME COMMAND
exegete  22199   0.0  0.2    79204   3280 s000  Z     9:16AM   0:00.78 vi
exegete  22185   0.0  0.0    75968    968 s000  S     9:16AM   0:00.01 -bash

According to the docs, a "Z" in the STAT column indicates a zombie process. Check the man pages: man ps

Using kill -9 <PID> to kill zomnie

OR

ps axo stat,ppid,pid,comm | grep -w defunct
ps -elf --forest | grep -C5 '<[d]efunct>'
 
OR
 

Basically:

1) Identify the zombie process:

ps axo stat,ppid,pid,comm | grep -w defunct

2) Kill the parent process:

sudo kill -9 <parent_process_number>
  
Đọc thêm..

Pulseaudio with HomeAssistant and Docker

I wanted to have direct 3.5mm pulse audio from Home Assistant container via the host with 3,5mm jack.
I added the following code in the docker-compose:
homeassistant:
    build: /home/docker-compose/homeassistant-custom
    restart: always
    volumes:
      - /dev:/dev
      - /tmp/.X11-unix:/tmp/.X11-unix
      - ~/.config/pulse/cookie:/root/.config/pulse/cookie
      - /run/user/1000/pulse:/run/user/1000/pulse
      - /var/run:/var/run
      - /run/dbus/:/run/dbus/:rw
      - /dev/shm:/dev/shm
    environment:
      - PULSE_SERVER=/run/user/1000/pulse/native
      - PULSE_COOKIE=/root/.config/pulse/cookie
    devices:
      - /dev/snd:/dev/snd
This code is added on top of your normal docker-compose lines.  Furthermore i created the home-assistant-custom dir and add the following in dockerfile
FROM homeassistant/home-assistant:latest
RUN apt-get update && \
    apt-get install -y vlc-nox apt-utils alsa-utils nano pulseaudio && \
    usermod -a -G audio root && \
    usermod -a -G pulse-access root
Now you can get TTS pulse audio from HA, just add a media_player:
media_player:
- platform: vlc
  name: speaker_1
  arguments: '--alsa-audio-device=hw:0,0'
And use it in a script or automation.


(https://www.martinvdm.nl/2018/08/25/pulseaudio-with-homeassistant-and-docker/)
Đọc thêm..

Rc.local on ubuntu 18.04

  1. Create a service:
    sudo vi /etc/systemd/system/rc-local.service
    
  2. Add your code there:
    [Unit]
    Description=/etc/rc.local Compatibility
    ConditionPathExists=/etc/rc.local
    
    [Service]
    Type=forking
    ExecStart=/etc/rc.local start
    TimeoutSec=0
    StandardOutput=tty
    RemainAfterExit=yes
    SysVStartPriority=99
    
    [Install]
    WantedBy=multi-user.target
    
  3. Create and make sure /etc/rc.local is executable and add this code inside it:
    sudo chmod +x /etc/rc.local
    #!/bin/sh -e
    #
    # rc.local
    #
    # This script is executed at the end of each multiuser runlevel.
    # Make sure that the script will "exit 0" on success or any other
    # value on error.
    #
    # In order to enable or disable this script just change the execution
    # bits.
    #
    # By default this script does nothing.
    
    exit 0
    
  4. Enable the service:
    sudo systemctl enable rc-local
    
  5. Start service and check status:
    sudo systemctl start rc-local.service
    sudo systemctl status rc-local.service
    
  6. If all goes well you can add your code to the /etc/rc.local file then restart it.
Đọc thêm..